
Imagine you are learning Cisco networking.
You want to configure routers, connect switches, test IP connectivity and practice troubleshooting.
However, purchasing physical Cisco networking equipment can be expensive.
How can you build a realistic Cisco networking laboratory without purchasing multiple physical devices?
One solution is Cisco Modeling Labs Free (CML-Free).
CML-Free is a no-cost network emulation platform developed by Cisco for individual learners.
It allows you to build virtual networking environments using supported Cisco operating-system images.
You can configure devices through the Cisco command-line interface (CLI), create network connections and test networking protocols.
The free edition allows up to five counted nodes to run simultaneously.
In this article, you will learn:
- What CML-Free is and what it includes
- CML-Free hardware and software requirements
- How to register and download CML-Free
- How to install the CML virtual machine using VMware Workstation
- How to configure CPU, RAM, storage and networking
- How to complete the initial CML configuration
- How to verify CML-Free licensing
- How to build your first virtual Cisco network
- How to configure and test two Cisco routers
- How to troubleshoot common installation problems
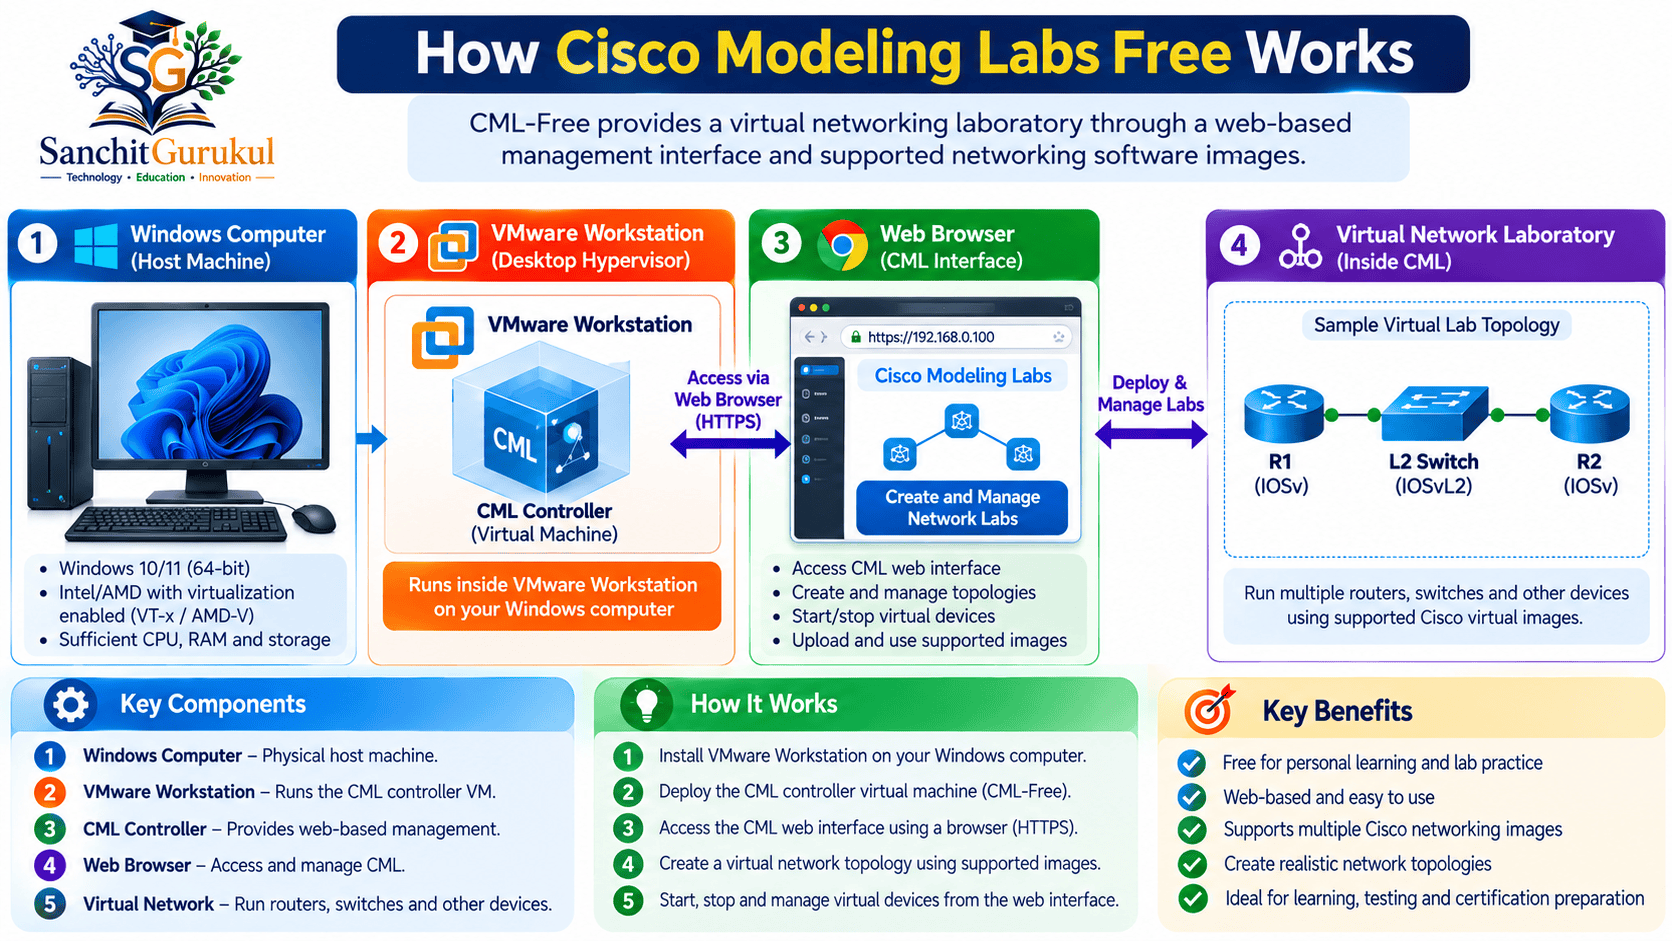
What Is CML-Free and What Are the Requirements?
Cisco Modeling Labs is an official Cisco network simulation and emulation platform.
CML-Free provides a no-cost option for learners who want to practice networking without purchasing a CML subscription.
The platform uses supported virtual device images called reference platforms.
These images provide the network operating-system software used by devices in your virtual laboratory.
CML-Free Features and Limitations
| Feature | CML-Free |
|---|---|
| Software Cost | Free |
| Paid Subscription | Not required |
| License Expiration | No free-tier time limit |
| Running Node Limit | 5 counted nodes |
| Router Platform | IOL |
| Switching Platform | IOL-L2 |
| Firewall Platform | ASAv |
| Linux Hosts | Supported images included |
| Web-Based Workbench | Yes |
| CLI Console | Yes |
| Packet Capture | Yes |
| Lab Import and Export | Yes |
| Intended Use | Individual learning |
Unmanaged Switch and External Connector nodes do not count toward the five-node limit.
Other running nodes, including Linux hosts, count toward the limit.
You can create a topology containing more devices, but only five counted nodes can run simultaneously.
Supported Virtual Device Images
CML-Free includes a limited set of reference platforms.
IOL
A lightweight Cisco IOS XE-based routing platform.
It supports many common routing protocols and networking features.
IOL-L2
A virtual switching platform for practicing Layer 2 networking.
It supports common switching concepts such as VLANs and Spanning Tree.
ASAv
A virtual Cisco ASA firewall used for supported firewall and security exercises.
Linux Hosts
CML-Free also includes selected Linux-based host images, including Ubuntu and Alpine Linux.
Available images depend on the installed reference platform package and CML release.
System Requirements
Before installing CML-Free, verify that your computer supports hardware virtualization.
For CML 2.10, Cisco specifies the following minimum CML server resources.
| Component | Minimum CML Requirement |
|---|---|
| CPU | 4 or more physical cores |
| RAM | 8 GB allocated to the CML VM |
| Storage | 32 GB or more |
| Network | At least one interface |
| Virtualization | Hardware-assisted virtualization |
| Browser | Supported modern Chrome or Firefox |
These values describe the CML virtual machine requirements, not the total host computer requirements.
The Windows operating system and VMware also require resources.
For a more comfortable beginner environment, consider:
- Modern Intel CPU with virtualization support
- 16–32 GB total host RAM
- SSD storage
- Additional free disk space for reference images and lab data
- Stable local network connectivity
Cisco fully supports Intel-based processors for CML virtual platform compatibility.
Some AMD-based configurations may work, but support and image compatibility are limited.
Apple Silicon Macs are not supported by this x86-based CML VMware deployment.
Download Cisco Modeling Labs Free from the Official Website
CML-Free should be downloaded only from Cisco’s official software distribution channels.
For a VMware installation, you need two main installation files.
Step 1 — Create a Cisco Account
Open the Cisco identity portal:
Create a Cisco account if you do not already have one.
Complete the registration process.
Cisco Software Central requires a completed account profile for software download authorization and applicable export-control checks.
Individual learners should follow Cisco’s instructions for completing the required company and address information.
Step 2 — Register for CML-Free
Open Cisco’s official registration page:
https://mkto.cisco.com/cml-free.html
Complete the registration.
Use the same Cisco account associated with your software download access.
Step 3 — Open Cisco Software Central
Visit the official CML-Free download page:
https://software.cisco.com/download/home/286193282/type/286326381/release/CML-Free
Sign in with your Cisco account.
Select the latest compatible CML-Free release available in the portal.
As of the October 2026 technical review, Cisco has published the CML 2.10.1 maintenance release.
Step 4 — Download the Required Files
For VMware Workstation, download:
| File Type | Purpose |
|---|---|
| Controller OVA | Installs the CML server virtual machine |
| CML-Free Reference Platform ISO | Provides the supported virtual device images |
The OVA file contains the CML controller, management services and web interface.
The reference platform ISO contains the images needed to run virtual routers, switches and other supported nodes.
Do not confuse the controller OVA with the bare-metal installation ISO.
The bare-metal image is used for a different installation method.
Step 5 — Verify the Downloaded Files
Confirm that both downloads are complete.
Check the file extensions:
.ovafor the controller appliance.isofor the reference platforms
If Cisco publishes a SHA-256 checksum, compare it against your downloaded file.
On Windows, PowerShell provides the Get-FileHash command.
Get-FileHash -Path "C:CML-FreeACTUAL_DOWNLOADED_FILENAME.ova" -Algorithm SHA256Replace ACTUAL_DOWNLOADED_FILENAME.ova with the exact file you downloaded.
Example output structure:
Algorithm : SHA256
Hash      : [Calculated SHA-256 value]
Path      : C:CML-FreeACTUAL_DOWNLOADED_FILENAME.ova
Compare the calculated hash with Cisco’s published checksum for that exact release.
Repeat the process for the reference platform ISO.

Install CML-Free Using VMware Workstation
This section explains how to deploy CML-Free as a virtual machine on a Windows computer.
The steps use VMware Workstation Pro.
Other supported installation methods, including VMware ESXi and compatible Intel-based VMware Fusion deployments, follow different procedures.
Step 1 — Install VMware Workstation
Download VMware Workstation Pro from Broadcom’s official distribution channel.
Official download information:
https://knowledge.broadcom.com/external/article/368667/download-and-license-information-for-vmw.html
Broadcom makes supported VMware Workstation Pro versions available without a paid desktop hypervisor license.
Install a supported release.
Cisco CML 2.10 documentation requires VMware Workstation 17 or later.
Complete the installation and restart Windows if necessary.
Step 2 — Verify Hardware Virtualization
Open Windows Task Manager.
Select:
Performance → CPU
Check the virtualization status.
If hardware virtualization is disabled, consult your computer manufacturer’s BIOS or UEFI documentation.
Enable the appropriate CPU virtualization option.
The exact setting name varies by system.
Step 3 — Import the CML Controller OVA
Open VMware Workstation.
Select:
File → Open
Browse to the downloaded CML Controller OVA.
Import the virtual appliance.
Choose a suitable virtual machine name and storage location.
After importing the appliance, open its settings.
Do not start the virtual machine yet.
Cisco recommends configuring the VM before its first boot.
Step 4 — Configure Processor and Memory
Open the CML virtual machine settings.
Under the processor settings:
- Allocate appropriate virtual CPUs.
- Enable the option to virtualize Intel VT-x/EPT.
- Ensure the host processor supports the required features.
For a basic learning installation, four vCPUs and 8 GB of RAM are a reasonable starting allocation on a suitably capable host.
Do not allocate nearly all host memory to CML.
Windows and VMware need sufficient resources to operate.
Step 5 — Configure Virtual Disk Storage
Cisco specifies a minimum of 32 GB of disk storage for the CML VM.
However, additional storage is useful for reference platform images and simulation data.
For a new installation, consider allocating 60 GB or more if sufficient storage is available.
If you plan to increase the virtual disk size, do so before the first boot.
CML can automatically expand its filesystems during initial installation when the disk is resized beforehand.
Step 6 — Attach the Reference Platform ISO
Open the CML VM settings.
Select the CD/DVD device.
Choose:
Use ISO image file
Browse to the downloaded CML-Free reference platform ISO.
Enable:
Connect at power on
This makes the reference platform ISO available during the initial CML setup.
Step 7 — Configure VMware Networking
Select the virtual machine’s network adapter.
For a local learning environment, NAT is often a convenient option.
| Network Mode | Behavior |
|---|---|
| NAT | Uses VMware’s virtual NAT network |
| Bridged | Places the VM on the physical LAN through the selected host adapter |
With NAT, the Windows host can normally reach the CML management interface through its VMware-assigned address.
Bridged mode depends on the physical network configuration and available DHCP services.
Step 8 — Review and Start the VM
Before powering on the CML VM, verify:
- CPU virtualization support is enabled.
- Sufficient RAM is allocated.
- Disk space is available.
- The reference platform ISO is connected.
- The virtual network adapter is configured.
Start the virtual machine.
Wait for the initial CML setup wizard to appear.

Complete Initial CML Setup and Verify Free Licensing
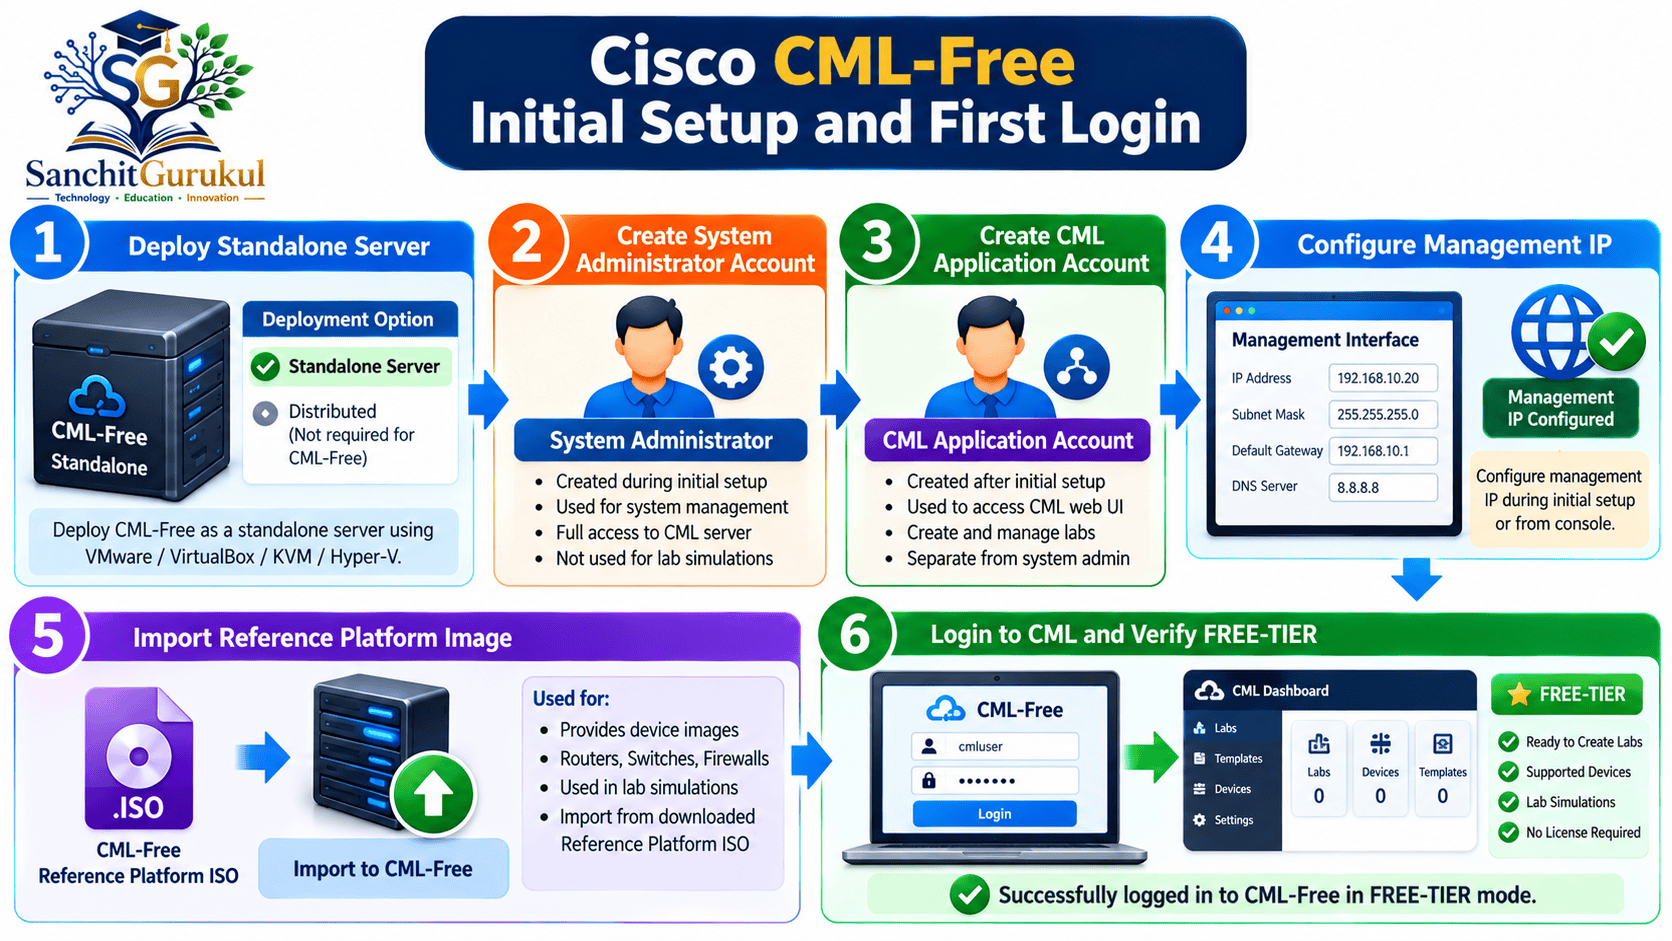
The first time CML starts, it displays an initial configuration wizard in the virtual machine console.
This wizard configures user accounts and management networking.
Step 1 — Select Standalone Deployment
For a personal CML-Free installation, use a standalone server.
If prompted to select the deployment type, choose:
Standalone
With only one active management interface, the wizard may automatically select standalone operation.
Step 2 — Create the System Administrator Account
Configure the CML system administrator username and password.
This account manages the underlying CML server.
It is used to access the System Administration Cockpit.
The Cockpit is available on HTTPS port 9090.
Step 3 — Create the CML Application Account
Create the initial CML application account.
This account is used to:
- Access the CML Dashboard
- Create virtual network laboratories
- Manage nodes and links
- Start and stop simulations
The application account and system administrator account serve different purposes.
Use strong, unique passwords.
Step 4 — Configure Management Networking
Choose DHCP or static IP addressing.
For many local laboratories, DHCP is suitable.
If your environment requires a stable management address, configure an appropriate static IP address.
Review the selected settings and confirm them.
Step 5 — Import the Reference Platform Images
If the reference platform ISO was attached before the initial boot, CML can copy the required images during setup.
Allow the copy operation to finish before proceeding.
The images must be present on CML’s local disk for simulations to run.
What If the Reference Platform ISO Was Not Imported?
You can import it after the CML installation is complete.
First, ensure the ISO is mounted on the CML virtual CD/DVD device.
Open the System Administration Cockpit using your CML management address and port 9090.
For example, the URL structure is:
https://CML-MANAGEMENT-IP:9090Replace CML-MANAGEMENT-IP with the address shown in your CML console.
Log in using the system administrator account.
Navigate to:
CML2 → Maintenance → Copy Refplat ISO
Start the copy operation.
Do not run laboratories while copying reference platform images.
Confirm the import completes successfully.
Step 6 — Open the CML Web Interface
The CML console displays the management address after initial setup.
Open the address in a supported web browser.
The URL normally uses HTTPS on port 443.
Sign in with the CML application account.
The CML Dashboard should appear.
Because a new installation may use a self-signed certificate, the browser may display a certificate warning.
Verify the address is your own CML server and configure a trusted certificate when appropriate.
Step 7 — Verify CML-Free Licensing
CML-Free does not require Cisco Smart Licensing registration.
Open the CML licensing page to inspect its status.
A working free-tier installation should indicate:
OK (FREE-TIER)The licensing interface may also show:
- Registration Status: Unregistered
- Authorization State: Evaluation Mode or Evaluation Expired
These labels do not mean that the CML-Free environment has stopped working.
Cisco documents that the free tier continues operating without a time limit.
Practical CML-Free Lab — Connect Two Cisco Routers
Now that CML-Free is installed, you can build your first virtual Cisco network.
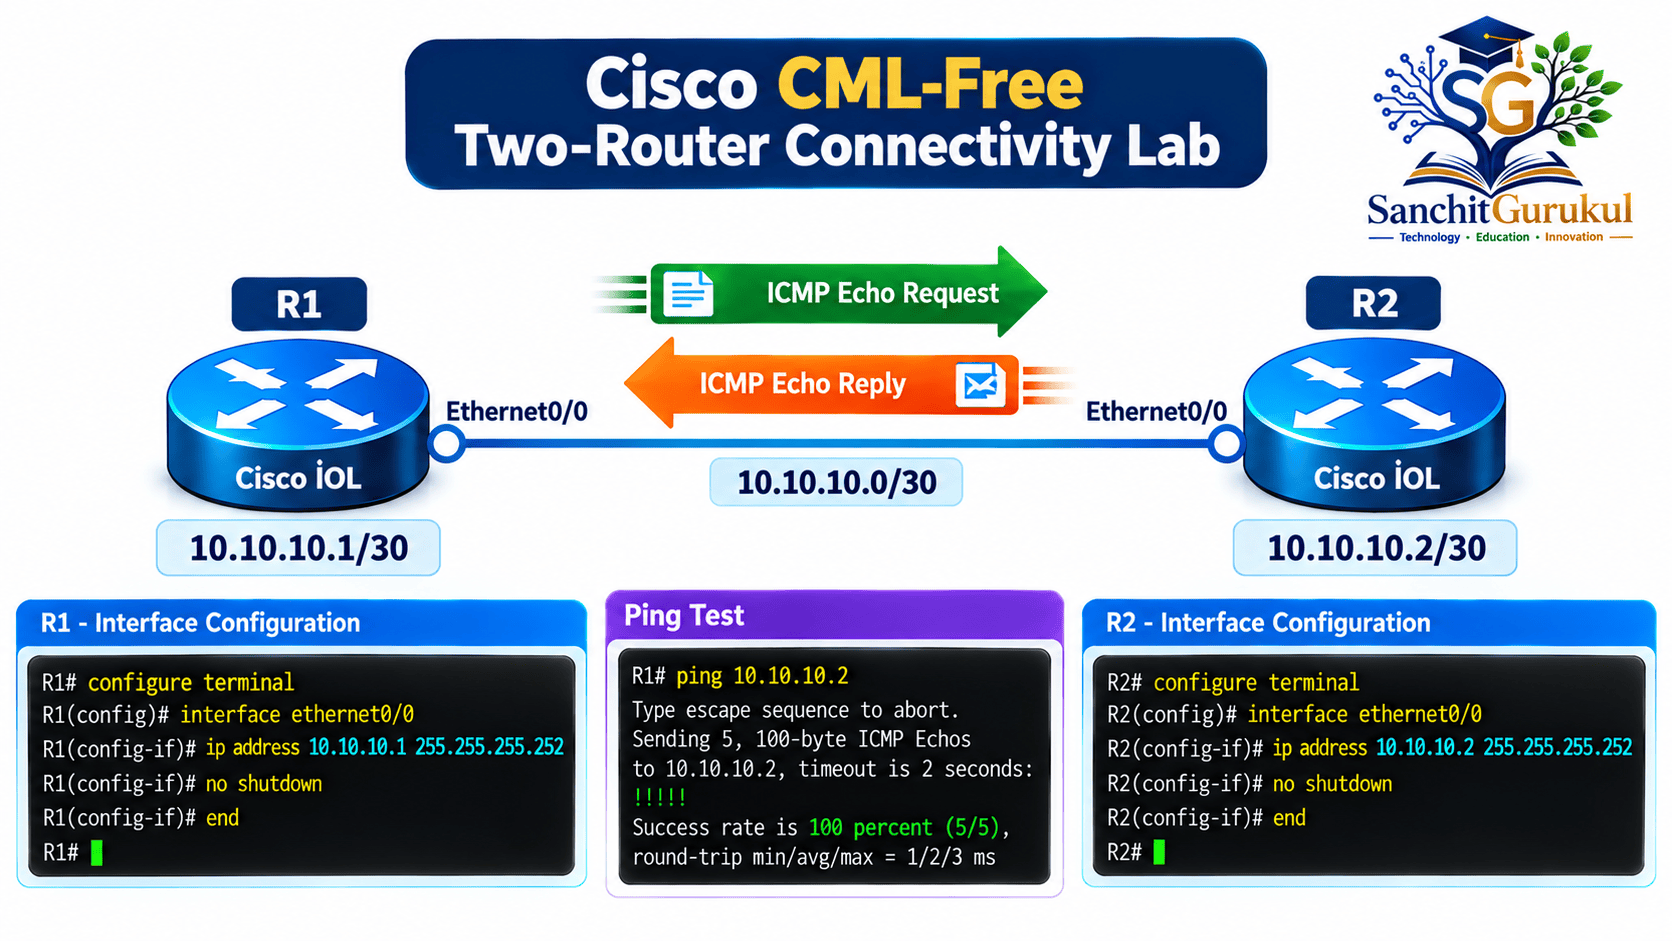
This laboratory demonstrates:
- Adding virtual networking devices
- Creating an Ethernet link
- Configuring IPv4 addresses
- Verifying interface status
- Testing connectivity
- Checking routing information
The lab requires only two IOL router nodes.
Lab Requirements
- Working CML-Free installation
- Two IOL routing nodes
- One virtual Ethernet connection
- Access to the CML Workbench
Lab Topology
| Device | Interface | IP Address |
|---|---|---|
| R1 | Ethernet0/0 | 10.10.10.1/30 |
| R2 | Ethernet0/0 | 10.10.10.2/30 |
Network: 10.10.10.0/30
The two devices are connected directly.
No separate routing protocol is required for communication between these interfaces.
Step 1 — Create a New Lab
Log in to CML.
From the Dashboard, create a new lab.
Name the laboratory:
CML-Free First Router Lab
Open it in the Workbench.
Step 2 — Add Two IOL Routers
In the Workbench, select Add Nodes.
Locate the IOL routing node type.
Drag two IOL routers onto the workspace.
Name them:
- R1
- R2
Do not select IOL-L2 for this particular routing exercise.
Step 3 — Connect the Router Interfaces
Right-click R1.
Select Add Link.
Choose R2 as the destination.
Select:
- R1: Ethernet0/0
- R2: Ethernet0/0
Create the link.
The Workbench should display an Ethernet connection between the routers.
Step 4 — Start the Simulation
In the Workbench, open the Lab menu.
Select Start Lab.
Wait for both routers to finish booting.
CML displays a green status indicator when a node is ready.
Step 5 — Open the Router Console
Right-click R1.
Select Console, then open the console connection.
Repeat the process for R2.
The console provides access to the Cisco CLI.
Step 6 — Verify the Router Interfaces
On R1, execute:
enable
show ip interface brief
Locate Ethernet0/0.
Confirm that the interface is available.
Step 7 — Configure Router R1
On R1, execute:
enable
configure terminal
hostname R1
interface Ethernet0/0
description Link-to-R2
ip address 10.10.10.1 255.255.255.252
no shutdown
end
The configuration assigns an IPv4 address and administratively enables the interface.
Verify the result.
show ip interface briefIllustrative output:
Interface    IP-Address   OK? Method Status Protocol
Et0/0        10.10.10.1   YES manual up     up
The exact output formatting may vary with the installed Cisco image.
Step 8 — Configure Router R2
On R2, execute:
enable
configure terminal
hostname R2
interface Ethernet0/0
description Link-to-R1
ip address 10.10.10.2 255.255.255.252
no shutdown
end
Verify the interface.
show ip interface briefIllustrative output:
Interface    IP-Address   OK? Method Status Protocol
Et0/0        10.10.10.2   YES manual up     up
Both routers should now have operational interfaces in the same IP subnet.
Step 9 — Test Connectivity
From R1:
ping 10.10.10.2Expected successful result:
Success rate is 100 percent (5/5)Actual results may vary.
The first ping may experience transient packet loss during initial address resolution.
Now execute the reverse test on R2.
ping 10.10.10.1Successful results confirm that both virtual routers can exchange ICMP traffic.
Step 10 — Verify the Routing Table
On R1:
show ip route connectedIllustrative relevant output:
C 10.10.10.0/30 is directly connected, Ethernet0/0The C route indicates a directly connected network.
A static route is unnecessary for this simple point-to-point IP connection.
Step 11 — Save the Router Configuration
On each router, execute:
copy running-config startup-configAccept the default destination filename when prompted.
This saves the Cisco device configuration.
Export the CML lab separately if you want a portable copy of the topology.
Step 12 — Stop the Lab
After completing the exercise, stop the simulation from the Workbench.
This releases the computing resources used by the active nodes.
Avoid wiping nodes unless you intend to reset their stored state.
Lab Verification Summary
| Verification | Expected Result |
|---|---|
| IOL Routers | Both running |
| Virtual Link | Connected |
| R1 Ethernet0/0 | 10.10.10.1/30 |
| R2 Ethernet0/0 | 10.10.10.2/30 |
| Interface Status | Up/Up |
| Ping R1 to R2 | Successful |
| Ping R2 to R1 | Successful |
| Connected Route | 10.10.10.0/30 |
Troubleshooting, Security and Legal Usage Guidelines
Most CML-Free problems are related to virtualization support, reference platform images, networking or system resources.
Common Installation Problems
| Problem | Possible Cause | Recommended Action |
|---|---|---|
| Download unavailable | Incomplete Cisco account | Review Cisco profile |
| VM fails to start | Virtualization settings | Check CPU support |
| Setup wizard stops | CPU extensions unavailable | Enable nested virtualization |
| CML web page unreachable | Incorrect IP or VM networking | Check management address |
| Nodes unavailable | Reference platforms missing | Import reference platform ISO |
| Node start fails | Insufficient CPU/RAM | Review available resources |
| Node limit reached | More than five counted nodes | Stop unused nodes |
| Ping fails | Incorrect IP or interface state | Verify interface configuration |
Troubleshooting Router Connectivity
Check interface status.
show ip interface briefCheck the running configuration.
show running-configCheck connected routes.
show ip route connectedFor this lab, verify that both Ethernet0/0 interfaces are connected, administratively enabled and configured in the same subnet.
CML-Free Security and Privacy
CML is a laboratory platform and should be protected like any other administrative service.
Recommended practices include:
- Use strong management passwords.
- Restrict management access to trusted networks.
- Keep CML and VMware updated.
- Avoid exposing the CML Dashboard directly to the public internet.
- Export or back up important lab configurations.
- Stop unused simulations.
Cisco documents that anonymized telemetry collection is enabled in CML-Free and cannot be disabled while using the free tier.
Cisco states that this telemetry excludes usernames, passwords, device configurations, simulation traffic and CLI usage.
Review Cisco’s current telemetry documentation before deploying CML in environments with strict privacy requirements.
Copyright and Software Licensing Guidelines
CML-Free includes Cisco reference platform images licensed for use within Cisco Modeling Labs.
These images must not be redistributed or used outside their permitted environment without appropriate authorization.
For educational websites and videos:
- Link to Cisco’s official download pages rather than distributing Cisco software images.
- Use original network diagrams wherever possible.
- Do not copy vendor documentation illustrations without permission.
- Verify applicable permissions before publishing software screenshots.
- Respect Cisco and VMware trademarks.
- Use the exact official SanchitGurukul logo only in SG-owned visual content.
- Check the applicable product license before using CML for commercial training or shared laboratory services.

Key Takeaways
CML-Free Fundamentals
- CML-Free is Cisco’s no-cost individual network emulation offering.
- It supports up to five counted running nodes.
- It includes selected Cisco networking and Linux reference platforms.
- No paid CML subscription is required.
Download and Installation
- Download the controller OVA and CML-Free reference platform ISO.
- Install a compatible VMware Workstation release.
- Enable the required processor virtualization capabilities.
- Allocate sufficient CPU, RAM and disk resources.
- Import the reference platform images before running labs.
Practical Networking
- The Workbench is used to create virtual topologies.
- IOL routers provide supported routing functionality.
- Virtual Ethernet links connect device interfaces.
- Cisco CLI commands configure and troubleshoot nodes.
- Ping and routing-table commands verify network connectivity.
Operations and Security
- Check
OK (FREE-TIER)to confirm free-tier operation. - Stop unused nodes to conserve resources.
- Protect the management interface.
- Follow Cisco software licensing requirements.
- Prefer original, properly licensed educational diagrams.
Cisco Modeling Labs Free provides an accessible environment for learning and practicing Cisco networking technologies.
It allows students and engineers to create working virtual networks without purchasing equivalent physical hardware.
A basic CML-Free installation can support routing, switching, firewall and troubleshooting exercises using its included reference platforms.
Once you understand how to install the platform and configure your first two-router network, you can move toward more advanced network scenarios.
Next in This Series: Cisco CML-Free Practical Labs — VLANs, Static Routing, OSPF and Packet Capture.
Useful Links and References
SanchitGurukul Static Resources
Official External References
Your feedback matters
Was this post helpful?
Discussion
0 approved comments
No approved comments yet. You can start the discussion below.
Leave a Comment
No login is required. Name and email are used for moderation/security. Your email is never displayed publicly. All comments require administrator approval.
Discover more from SanchitGurukul
Subscribe to get the latest posts sent to your email.