
FreeRADIUS is an open-source implementation of the RADIUS — Remote Authentication Dial-In User Service — protocol.
It is commonly used to provide centralized:
- Authentication
- Authorization
- Accounting
These three functions are commonly abbreviated as:
AAA
FreeRADIUS can provide authentication services for:
- Enterprise Wi-Fi
- VPN gateways
- Network switches
- Firewalls
- Network Access Control
- Remote-access systems
- Internet service providers
- Administrative network access
Instead of maintaining separate credentials on every network device, the devices can send authentication requests to a central FreeRADIUS server.
The FreeRADIUS server can then use:
- Local users
- LDAP
- Active Directory
- SQL databases
- Certificates
- External identity systems
to make authentication and authorization decisions.

Plan the FreeRADIUS Deployment
Before installing FreeRADIUS, identify what the server will authenticate.
For example:
RADIUS Server: radius01.example.com
IP Address: 192.0.2.50

RADIUS Clients:
Wireless Controller: 192.0.2.10
VPN Gateway: 192.0.2.20
Network Switch: 192.0.2.30
RADIUS Authentication Port
The standard RADIUS authentication port is:
UDP 1812RADIUS Accounting Port
RADIUS accounting normally uses:
UDP 1813Older systems may still use legacy ports such as:
- UDP 1645
- UDP 1646
but modern deployments should normally use the standardized assignments unless a specific legacy requirement exists.
Choose the Authentication Method
FreeRADIUS can support many authentication designs.
Examples include:
- PAP
- CHAP
- MS-CHAPv2
- PEAP
- EAP-TTLS
- EAP-TLS
The correct method depends on the actual application.
For example:
Enterprise Wi-Fi
may use:
- PEAP/MS-CHAPv2
- EAP-TLS
- EAP-TTLS
VPN
may use RADIUS authentication through the VPN gateway.
Network Device Administration
may use PAP or another vendor-supported RADIUS authentication method.
Version Considerations
As of the July 2026 technical review, the FreeRADIUS project had released:
FreeRADIUS 3.2.10
as the current stable 3.2 series release.
FreeRADIUS 4.0 remained a development branch.
This article therefore uses the FreeRADIUS 3.x configuration layout commonly found on Ubuntu.
Typical Ubuntu configuration directory:
/etc/freeradius/3.0/Install FreeRADIUS on Ubuntu
Step 1 — Check Whether FreeRADIUS Is Already Installed
freeradius -vYou can also check installed packages:
dpkg -l | grep freeradiusIf FreeRADIUS is installed, review the existing configuration before reinstalling or replacing it.
Step 2 — Update Ubuntu
sudo apt updateApply appropriate operating-system updates according to your change-management process.
Step 3 — Install FreeRADIUS
sudo apt install -y freeradius freeradius-utilsThe freeradius-utils package provides useful administrative and testing tools such as:
- radtest
- radclient
- radwho
- radlast
Step 4 — Check the Installed Version
freeradius -vFor production systems, use a currently supported FreeRADIUS release and apply security updates promptly.
Step 5 — Check the Service
systemctl status freeradiusEnable the service at boot:
sudo systemctl enable freeradiusStart it if necessary:
sudo systemctl start freeradiusStep 6 — Verify Listening Ports
sudo ss -lunp | grep -E ':1812|:1813'A typical server may listen for:
- Authentication on UDP 1812
- Accounting on UDP 1813
The exact listeners depend on the FreeRADIUS configuration.
Main Configuration Directory
On Ubuntu, important FreeRADIUS 3.x files commonly exist beneath:
/etc/freeradius/3.0/Important locations include:
clients.conf
mods-available/
mods-enabled/
mods-config/
sites-available/
sites-enabled/
certs/Configure a Test User and RADIUS Client
Before integrating Wi-Fi, LDAP, Active Directory, or a VPN, prove that the basic RADIUS server works.
Step 1 — Add a Local Test User
In FreeRADIUS 3, the traditional users file is normally located at:
/etc/freeradius/3.0/mods-config/files/authorizeEdit it:
sudo nano /etc/freeradius/3.0/mods-config/files/authorizeAdd a temporary test user near the beginning:
sgtest Cleartext-Password := "ChangeThisLabPassword"Cleartext-Password represents FreeRADIUS’s known-good password for this test account.
Do not use this simple local-user method as the long-term identity architecture for a large enterprise environment.
Step 2 — Validate the Configuration
sudo freeradius -XCIf the configuration is valid, FreeRADIUS should complete validation without fatal errors.
Step 3 — Run FreeRADIUS in Debug Mode
Stop the service first:
sudo systemctl stop freeradiusThen run:
sudo freeradius -XDebug mode is one of the most important FreeRADIUS troubleshooting tools.
A healthy startup should eventually show that the server is:
Ready to process requestsKeep this terminal open.
Step 4 — Test Locally with radtest
Open another terminal.
FreeRADIUS normally includes a localhost client definition for testing.
Use the shared secret configured for that localhost client.
A common default laboratory example is:
radtest sgtest 'ChangeThisLabPassword' 127.0.0.1 0 testing123radtest arguments are:
radtest username password radius-server nas-port shared-secretSuccessful authentication should return:
Access-AcceptAn unsuccessful authentication may return:
Access-RejectUnderstand the Credentials
The test contains two different credentials.
User Password
ChangeThisLabPasswordThis belongs to:
sgtest
RADIUS Shared Secret
testing123This is shared between:
- RADIUS client
- FreeRADIUS server
They are not the same security mechanism.
radtest Authentication Type
By default, radtest uses:
PAP
It can also test selected methods such as:
- CHAP
- MS-CHAP
- EAP-MD5
depending on the installed tools and options.
It does not provide a complete EAP-TLS test.
Configure Real RADIUS Clients and Network Access
Once local testing succeeds, define actual network devices.
Configure a RADIUS Client
Edit:
sudo nano /etc/freeradius/3.0/clients.confAdd a network device:
client wireless-controller {
    ipaddr = 192.0.2.10
    secret = REPLACE_WITH_LONG_RANDOM_SHARED_SECRET
}
Another example:
client vpn-gateway {
    ipaddr = 192.0.2.20
    secret = USE_A_DIFFERENT_LONG_RANDOM_SECRET
}
Use Unique Secrets
Where operationally practical, use different shared secrets for different RADIUS clients.
This limits the impact if one device’s secret is exposed.
Match the Source Address
The ipaddr value must correspond to the address from which FreeRADIUS actually receives the RADIUS packet.
A network device may send RADIUS traffic from:
- Management interface
- Loopback
- VLAN interface
- NAT address
Use packet capture or debug output if the actual source address is unclear.
Restrict Firewall Access
If UFW is enabled, restrict access to known NAS addresses.
Example authentication access:
sudo ufw allow from 192.0.2.10 to any port 1812 proto udpAccounting:
sudo ufw allow from 192.0.2.10 to any port 1813 proto udpRepeat only for authorized RADIUS clients.
Avoid exposing UDP 1812 or 1813 broadly to untrusted networks.
Validate Again
sudo freeradius -XCRestart:
sudo systemctl restart freeradiusTest from the Actual Client
Configure the network device with:
- RADIUS server IP
- Authentication port
- Accounting port if required
- Shared secret
Then monitor FreeRADIUS:
sudo systemctl stop freeradius
sudo freeradius -X
Attempt authentication from the actual network service.
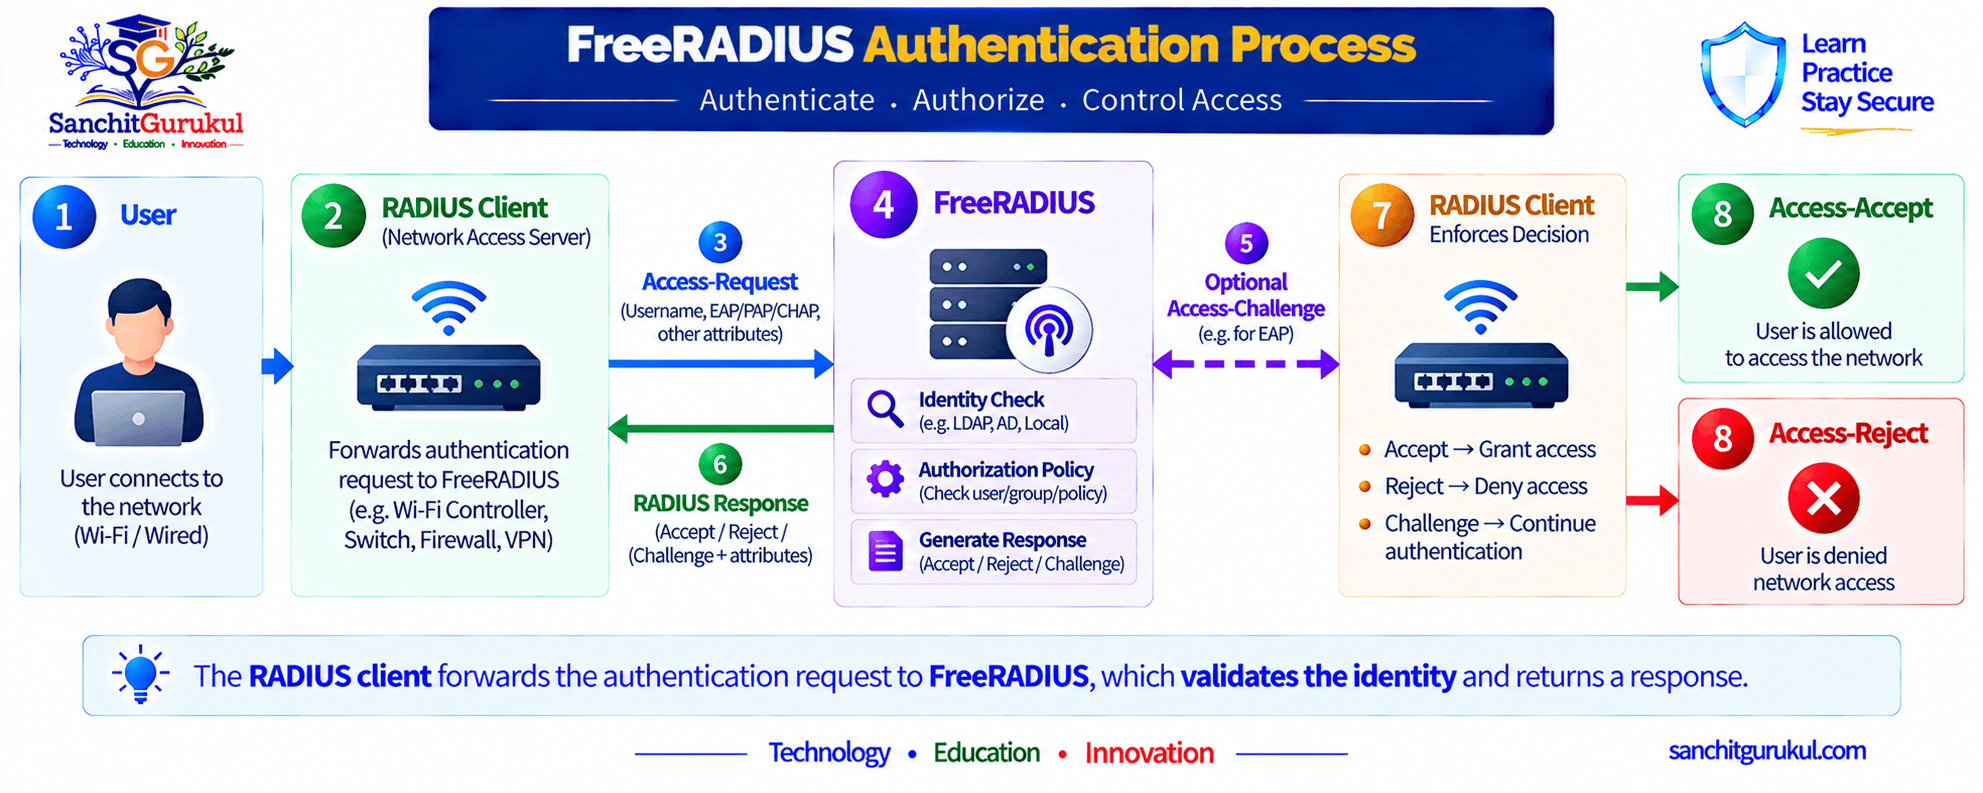
RADIUS Response Types
Common RADIUS responses include:
Access-Accept
Authentication/authorization was accepted.
Access-Reject
Access was rejected.
Access-Challenge
Additional authentication exchange is required.
EAP authentication commonly involves multiple:
- Access-Request
- Access-Challenge
messages before the final result.
Configure EAP, PEAP and EAP-TLS Securely
Enterprise Wi-Fi commonly uses EAP through RADIUS.
FreeRADIUS includes EAP configuration under:
/etc/freeradius/3.0/mods-available/eapThe enabled module is normally linked under:
/etc/freeradius/3.0/mods-enabled/eapCommon EAP Methods
EAP-TLS
Uses certificates for authentication.
Normally requires:
- Server certificate
- Trusted CA
- Client certificate
- Client private key
It provides strong certificate-based authentication when PKI is correctly implemented.
PEAP
Creates a TLS-protected outer tunnel and then uses an inner authentication method.
A common historical deployment is:
PEAP/MS-CHAPv2
EAP-TTLS
Creates a TLS tunnel and can carry various inner authentication mechanisms such as PAP.
Server Certificate Validation Is Critical
For PEAP and EAP-TTLS, clients must validate the RADIUS server certificate.
If users disable certificate validation, a malicious system may impersonate the authentication server and attempt to capture credentials.
Clients should validate:
- Trusted CA
- Certificate validity
- Intended server identity
FreeRADIUS Test Certificates
FreeRADIUS includes certificate-generation material for testing.
Typical directory:
/etc/freeradius/3.0/certs/These certificates are useful for:
- Lab environments
- Initial EAP testing
- Learning FreeRADIUS
They should not be used for a normal production deployment.
Generate Laboratory Certificates
For a test environment, inspect:
cd /etc/freeradius/3.0/certsReview the configuration before generating anything.
Where the packaged Makefile is provided:
sudo makeThe exact files generated depend on the packaged FreeRADIUS configuration.
Typical laboratory artifacts may include:
- CA certificate
- Server certificate
- Server private key
- Client certificate
- Client private key
Verify a Certificate
openssl x509
-in /etc/freeradius/3.0/certs/server.pem
-noout
-subject
-issuer
-dates
Production Certificates
For production EAP:
- Use an appropriately managed CA.
- Protect private keys.
- Define server identity clearly.
- Configure clients to trust only the required CA.
- Configure clients to validate the expected RADIUS server name.
- Establish certificate renewal procedures.
For EAP-TLS, carefully control which client certificates are allowed to authenticate.
Testing EAP-TLS
Do not test EAP-TLS with a normal PAP radtest command.
Use:
- Actual wireless supplicant
- Wired 802.1X supplicant
- Purpose-built EAP testing tools such as
eapol_testwhere appropriate
During the test, run FreeRADIUS in debug mode:
sudo freeradius -XA successful EAP exchange may contain multiple:
Access-Request
Access-Challenge
messages before ending with:
Access-AcceptTroubleshoot and Secure FreeRADIUS
Start with Debug Mode
The first troubleshooting command should usually be:
sudo freeradius -XDebug output shows:
- Packet source
- RADIUS client match
- Username
- Authentication method
- Modules called
- Policy decisions
- Access-Accept
- Access-Reject
- EAP processing
- Certificate errors
Service Fails to Start
Check:
systemctl status freeradiusThen:
journalctl -u freeradius --since "30 minutes ago"Validate configuration:
sudo freeradius -XCAddress Already in Use
If debug mode reports that the RADIUS address or port is already in use, the normal systemd service may still be running.
Stop it:
sudo systemctl stop freeradiusThen:
sudo freeradius -XUnknown Client
A message such as:
Ignoring request from unknown clientusually means the packet source address does not match a configured client.
Check:
clients.confand verify the actual packet source.
Invalid Shared Secret
If the server receives traffic but authentication appears corrupted or responses are rejected, confirm that the same RADIUS shared secret is configured on both:
- NAS
- FreeRADIUS
Access-Reject
Do not automatically assume:
Wrong password
Access-Reject can also result from:
- User not found
- Wrong password format
- Authentication method mismatch
- Authorization policy
- Group policy
- EAP failure
- Backend failure
- Certificate problem
Read the complete debug output.
Capture RADIUS Packets
sudo tcpdump -ni any udp port 1812Authentication and accounting:
sudo tcpdump -ni any 'udp port 1812 or udp port 1813'Use packet capture only on systems and traffic you are authorized to inspect.
radtest Works but Wi-Fi Fails
This is a common troubleshooting trap.
A normal:
radtesttest uses PAP by default.
Your Wi-Fi environment may use:
PEAP/MS-CHAPv2
or:
EAP-TLS
Therefore:
PAP working does not prove that the actual EAP configuration is correct.
Always test the authentication protocol used in production.
Keep FreeRADIUS Updated
FreeRADIUS security releases in June 2026 included important fixes, and the project recommended upgrading to the current 3.2 release.
Do not leave old unsupported FreeRADIUS installations exposed indefinitely.
BlastRADIUS Hardening
The 2024 BlastRADIUS disclosure highlighted protocol-level risks affecting traditional RADIUS deployments.
Modern FreeRADIUS releases include mitigations involving:
Message-Authenticator- Proxy-State handling
- Updated client behavior
Use a current supported release and follow current FreeRADIUS security guidance when configuring legacy RADIUS clients.
Do not disable security protections merely to preserve compatibility with obsolete equipment without understanding the risk.
Protect Shared Secrets
Use:
- Long random secrets
- Different secrets where possible
- Restricted configuration permissions
- Secure backup procedures
Avoid:
radiussecrettesting123- Device hostname
- Company name
for production secrets.
Consider RadSec for Untrusted Networks
Traditional RADIUS does not encrypt the entire RADIUS packet.
If RADIUS must cross an untrusted network, consider architectures using:
RADIUS over TLS — RadSec
or another suitable protected transport.
Back Up the Configuration
Example:
sudo tar -czf freeradius-config-backup.tar.gz /etc/freeradius/3.0/The resulting backup may contain:
- Shared secrets
- Private keys
- Passwords
- Backend credentials
Protect it accordingly.

Key Takeaways and Summary
Key Takeaways
- FreeRADIUS provides centralized RADIUS authentication, authorization and accounting.
- On Ubuntu, FreeRADIUS 3.x configuration is normally located under
/etc/freeradius/3.0/. - RADIUS authentication normally uses UDP 1812 and accounting uses UDP 1813.
- Test the default server locally before integrating Wi-Fi, VPN, LDAP or Active Directory.
- In FreeRADIUS 3, local test users are normally placed in
mods-config/files/authorize. radtestdefaults to PAP and does not provide a complete EAP-TLS test.- Every real RADIUS client must be defined with the correct source IP and shared secret.
- Production EAP deployments require carefully managed certificates and server-certificate validation.
- FreeRADIUS demonstration certificates are for testing, not normal production use.
freeradius -Xis one of the most valuable troubleshooting tools available to a FreeRADIUS administrator.
Summary
Installing FreeRADIUS on Ubuntu is relatively simple.
Building a secure and reliable RADIUS architecture requires more than installing a package.
A good deployment process is:
Install FreeRADIUS → Validate default configuration → Create a test user → Test locally → Add RADIUS clients → Secure network access → Configure the real authentication method → Test with the actual client → Monitor and maintain
For initial testing:
sudo freeradius -Xand:
radtestprovide a fast way to confirm that basic RADIUS authentication works.
For production environments, also consider:
- Strong shared secrets
- Firewall restrictions
- EAP server-certificate validation
- Secure certificate lifecycle management
- Current FreeRADIUS security releases
- Centralized identity backends
- Logging and monitoring
- Configuration backups
- RadSec where appropriate
Most importantly:
Do not test one authentication method and assume every other method will work.
PAP, PEAP, MS-CHAPv2 and EAP-TLS use different authentication mechanisms and backend requirements.
Build and test each layer independently.
That approach produces a FreeRADIUS deployment that is easier to operate, troubleshoot and secure.
Useful Links and References
SanchitGurukul Static Resources
Official External References
Your feedback matters
Was this post helpful?
Discussion
0 approved comments
No approved comments yet. You can start the discussion below.
Leave a Comment
No login is required. Name and email are used for moderation/security. Your email is never displayed publicly. All comments require administrator approval.
Discover more from SanchitGurukul
Subscribe to get the latest posts sent to your email.