
Imagine an employee connecting to a company’s VPN.
The employee enters the correct username, but the company also wants to verify that the connection originates from an authorized corporate device.
How can the organization verify the device without relying only on a password?
One solution is Certificate-Based Authentication.
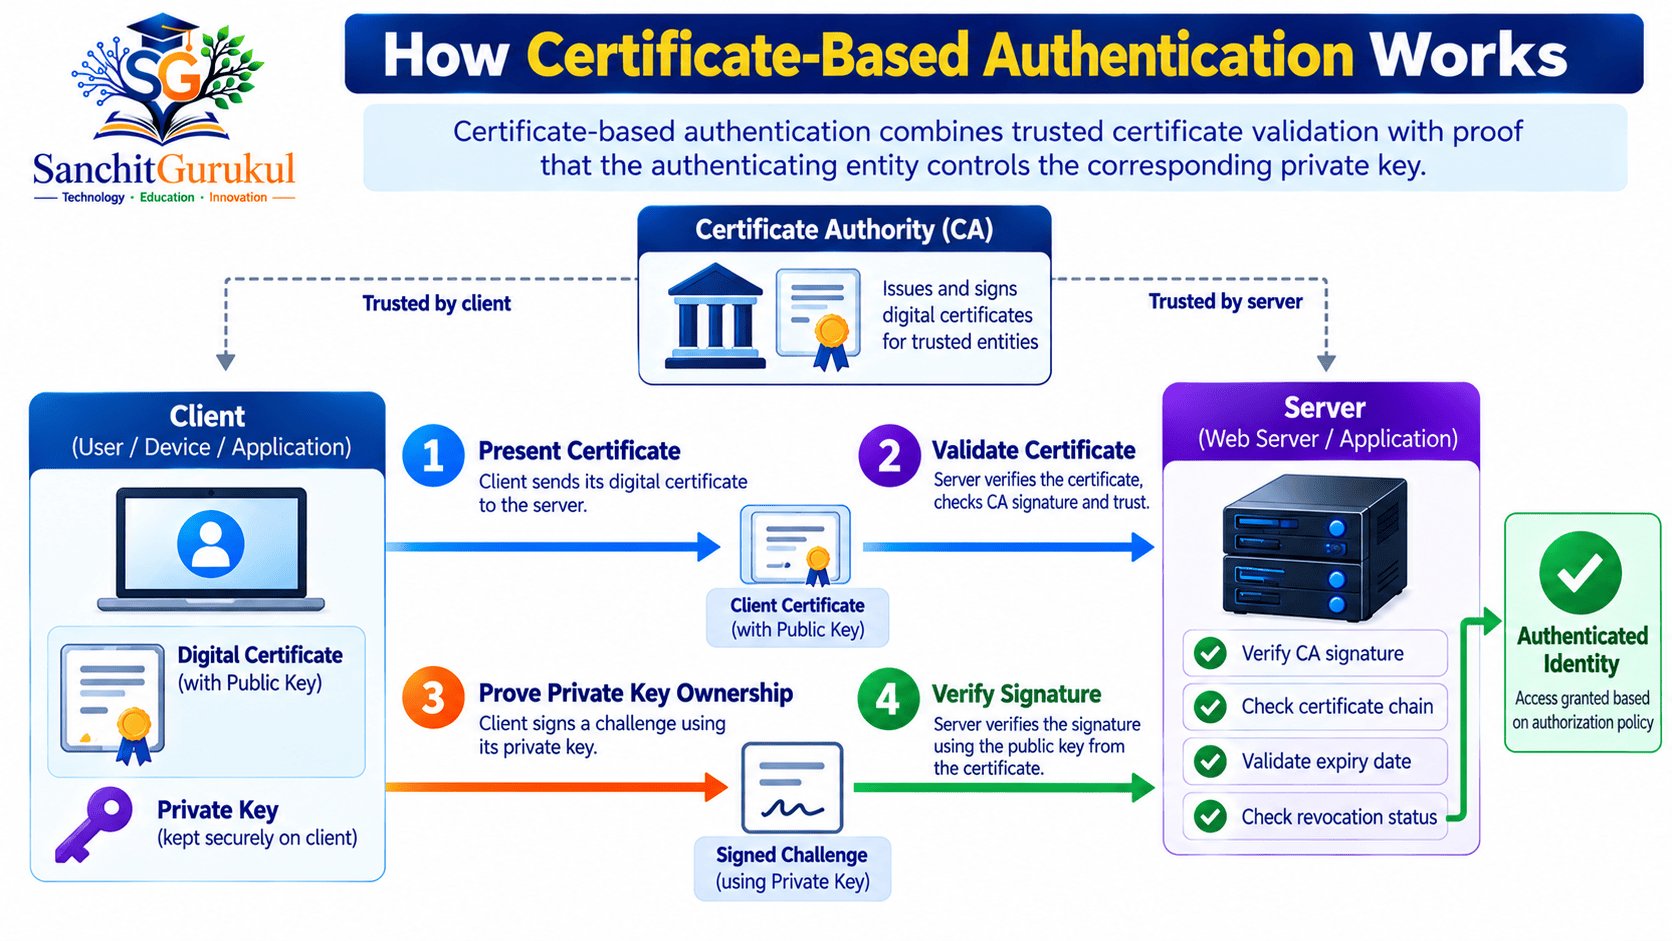
Certificate-based authentication uses digital certificates and public-key cryptography to verify the identity of users, devices, servers or applications.
Instead of depending entirely on a shared password, the system verifies a trusted certificate and checks whether the authenticating entity controls the corresponding private key.
This approach is widely used in HTTPS, VPNs, enterprise Wi-Fi, smart cards, mutual TLS (mTLS) and machine-to-machine communication.
In this article, you will learn:
- What certificate-based authentication is
- How digital certificates and PKI work
- The difference between public and private keys
- How a Certificate Authority establishes trust
- How TLS 1.3 uses certificates for authentication
- The difference between server authentication and mutual TLS
- How certificates are issued, renewed and revoked
- Important certificate security risks and best practices
- How to create a local CA and test mTLS using OpenSSL
What Is Certificate-Based Authentication and How Does It Work?
Certificate-based authentication is an identity-verification method based on public-key cryptography and digital certificates.
A certificate normally binds a public key to an identity or an identifier under a defined trust framework.
That identity might represent:
- A website or server
- A network device
- An employee
- A corporate workstation
- An application or service
- An email identity
The system accepting the certificate is called the relying party.
It decides which Certificate Authorities and certificate identities are trusted for a particular operation.
Public Key vs Private Key
Certificate-based authentication uses an asymmetric cryptographic key pair.
| Component | Purpose | Security Requirement |
|---|---|---|
| Public Key | Verifies signatures or supports other permitted cryptographic operations | Can be distributed |
| Private Key | Creates signatures or performs other permitted private-key operations | Must remain protected |
| Digital Certificate | Associates a public key with an identity or identifier | Must be validated |
| CA Signature | Protects the certificate’s integrity and identifies its issuer | Must chain to an accepted trust anchor |
In modern signature-based authentication, the private key signs specified data.
The receiving system verifies the signature using the public key.
This provides proof of possession of the corresponding private key.
What Is an X.509 Certificate?
X.509 is a widely used certificate format standardized for Internet PKI through specifications including RFC 5280.
A typical X.509 certificate contains:
| Field | Description |
|---|---|
| Subject | Identity information associated with the certificate |
| Issuer | Certificate issuer |
| Public Key | Public key associated with the subject |
| Serial Number | Identifier assigned by the issuer |
| Validity Period | Not-before and not-after dates |
| Subject Alternative Name (SAN) | Additional identity identifiers |
| Key Usage | Permitted cryptographic operations |
| Extended Key Usage (EKU) | Intended application purposes |
| Signature | Issuer’s digital signature |
The corresponding private key is not stored inside the public certificate.
What Is a Certificate Authority?
A Certificate Authority (CA) issues and signs digital certificates.
Depending on its operating policy, a CA may validate:
- Control of a domain name
- Ownership or identity of an organization
- A user’s enterprise identity
- A device’s enrollment authorization
- A service’s identity
The strength of the identity assurance depends on the CA’s verification procedures and certificate policy.
What Is a Public Key Infrastructure (PKI)?
PKI is the framework used to issue, validate, manage and revoke digital certificates.
It includes technologies, policies and operational services.
Common components include:
- Root CA
- Intermediate CA
- Registration Authority (RA)
- Certificate management system
- Certificate holders
- Trust stores
- Revocation services
- Certificate lifecycle automation
PKI Architecture — Root CA, Intermediate CA and Certificate Trust
Certificates are trusted through a certificate chain.
A certificate chain connects the certificate being presented to a trusted authority.
1. Root Certificate Authority
The Root CA is the trust anchor for a certificate hierarchy.
Its certificate is normally self-signed.
The Root CA’s private key is especially sensitive because its compromise could undermine trust in certificates issued beneath it.
Organizations frequently protect root keys using offline systems or Hardware Security Modules (HSMs).
2. Intermediate Certificate Authority
An intermediate CA is authorized by a parent CA to issue certificates within defined constraints.
It allows the Root CA to remain more isolated from routine certificate issuance.
3. End-Entity Certificate
An end-entity, or leaf, certificate is used by a server, user, device or service.
For example:
- Web server TLS certificate
- VPN user certificate
- Workstation certificate
- API client certificate
How Certificate Chain Validation Works
A relying party attempts to build a certification path from the presented certificate to a trusted root or another accepted trust anchor.
Depending on the application and certificate profile, important checks include:
- Valid certificate signatures.
- An acceptable trust anchor.
- Valid certificate dates.
- Appropriate CA constraints.
- Permitted key usage and extended key usage.
- Required identity information.
- Certificate revocation status, according to the applicable policy.
A successfully validated certificate chain establishes trust in the public-key-to-identity binding under the selected trust model.
It does not automatically grant access to every application or resource.

Public CA vs Private CA
| Feature | Public CA | Private Enterprise CA |
|---|---|---|
| Typical Purpose | Public websites and Internet services | Internal services and devices |
| Trust | Recognized through applicable public trust programs | Configured by the organization |
| Certificate Policy | Publicly trusted issuance requirements | Enterprise-defined policy |
| Example | Public HTTPS server certificate | Internal VPN client certificate |
A private CA can be appropriate for internal systems.
However, its root certificate must be distributed and trusted securely.
Do not install an unfamiliar root CA simply to remove a certificate warning. Adding a root CA expands which certificates a system may trust.
How TLS 1.3 and Mutual TLS Use Certificates for Authentication
Certificates play an important role in Transport Layer Security (TLS).
TLS protects network communication and supports authentication of participating endpoints.
Modern HTTPS uses TLS rather than the obsolete SSL protocols.
Server Certificate Authentication
In a typical HTTPS connection, the web server presents a certificate to the client.
The client checks:
- Whether the certificate is trusted
- Whether the certificate is currently valid
- Whether the server’s identity matches the expected service name
- Whether applicable certificate and trust policies are satisfied
For DNS-based HTTPS authentication, the server identity is expressed through the certificate’s Subject Alternative Name (SAN) extension.
Modern service-identity guidance does not rely on the legacy Common Name field as the hostname verification source.
How TLS 1.3 Proves Private-Key Possession
TLS 1.3 uses the CertificateVerify handshake message for certificate-based authentication.
The certificate holder signs defined handshake information using its private key.
The peer verifies the signature using the public key associated with the certificate.
This signature is bound to the current handshake.
It is not the older simplified model in which the server encrypts a random challenge using the client’s public key and asks the client to decrypt it.
What Is Mutual TLS (mTLS)?
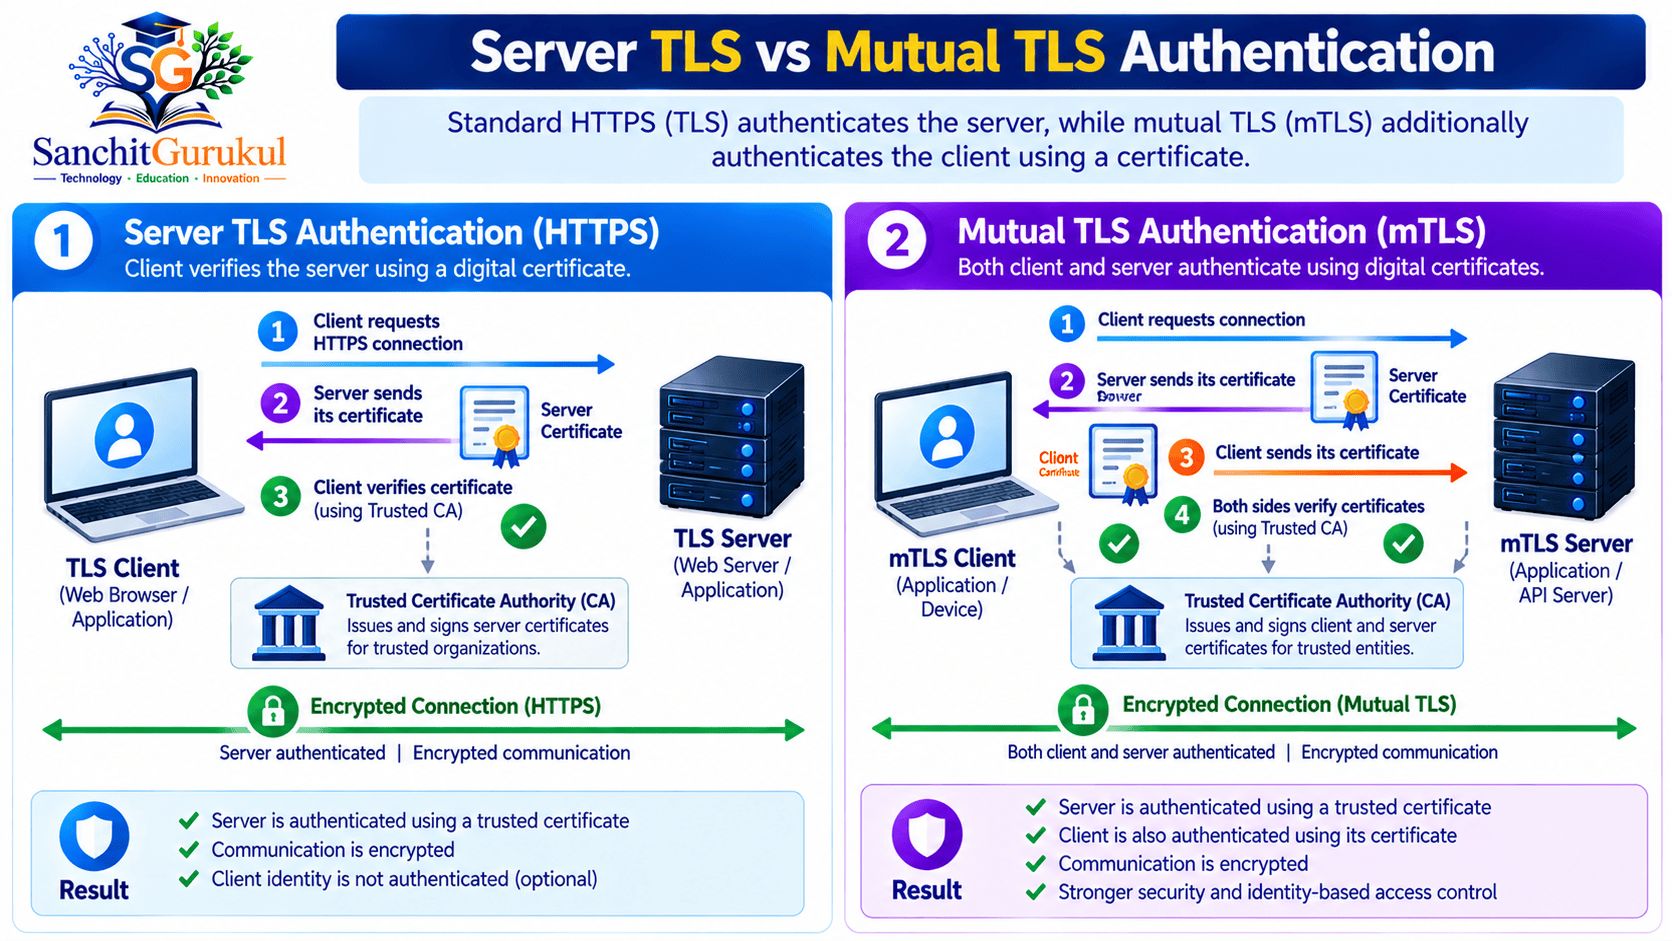
Mutual TLS means that both sides authenticate using TLS certificates.
In ordinary server-authenticated HTTPS:
- The client authenticates the server through its certificate.
- The client might authenticate to the application later using a password, session or passkey.
In mutual TLS:
- The client authenticates the server.
- The server requests and validates the client’s certificate.
- The client proves possession of the corresponding private key.
TLS vs mTLS Comparison
| Feature | Server-Authenticated TLS | Mutual TLS |
|---|---|---|
| Server Certificate | Required for certificate-based server authentication | Required |
| Client Certificate | Normally not required | Required by the mTLS policy |
| Server Identity Verification | Yes | Yes |
| Client Certificate Verification | No | Yes |
| Typical Use | HTTPS websites | Protected APIs, internal services, VPN-related deployments |
Example — Service-to-Service Authentication
Certificate Lifecycle, Modern Standards and Security Best Practices
Certificate security depends on the complete certificate lifecycle.
Certificates must be securely created, issued, deployed, monitored and retired.
Certificate Lifecycle
| Stage | Purpose |
|---|---|
| Key Generation | Creates a public-private key pair |
| Enrollment | Requests a certificate for an identity |
| Validation | Verifies the applicant according to policy |
| Issuance | CA signs the certificate |
| Deployment | Certificate and private key are installed appropriately |
| Monitoring | Tracks validity, health and upcoming expiration |
| Renewal | Replaces or renews credentials according to policy |
| Revocation | Marks a certificate as no longer trustworthy |
| Retirement | Removes obsolete certificates and keys |
Certificate Revocation
A certificate may need to be revoked because:
- Its private key is compromised.
- A device has been decommissioned.
- A user leaves an organization.
- The certificate was issued incorrectly.
- An identity or authorization relationship is no longer valid.
Two established certificate-status mechanisms are:
Certificate Revocation List (CRL)
A CA-signed list of revoked certificates.
Online Certificate Status Protocol (OCSP)
A protocol for obtaining certificate status information from an authorized responder.
Certificate-status enforcement varies by application, certificate type and operating policy.
A certificate can appear valid by date and signature even when its status should be considered revoked.
Important 2026 Update — Public TLS Certificate Lifetimes
The CA/Browser Forum adopted a phased reduction in maximum validity periods for publicly trusted TLS server certificates.
| Issuance Period | Maximum Validity |
|---|---|
| Before March 15, 2026 | 398 days |
| March 15, 2026–March 14, 2027 | 200 days |
| March 15, 2027–March 14, 2029 | 100 days |
| March 15, 2029 onward | 47 days |
These limits apply to certificates covered by the publicly trusted TLS Baseline Requirements.
They do not automatically govern every private PKI certificate.
The reductions make automated certificate issuance and renewal increasingly important.
Automating Certificate Management
Organizations can use supported certificate management systems to automate:
- Certificate requests
- Domain or identity validation
- Issuance
- Renewal
- Deployment
- Expiration monitoring
ACME is a standardized protocol used for automated certificate management.
For public TLS services, ACME-based automation can reduce the risk of outages caused by expired certificates.
Certificate Security Best Practices
1. Protect Private Keys
Use protected key storage and appropriate access controls.
Where required, consider hardware-backed protection using a TPM, smart card or HSM.
2. Use Appropriate Certificate Extensions
Configure certificate purposes using Key Usage and Extended Key Usage.
For example:
serverAuthfor TLS server authenticationclientAuthfor TLS client authentication
3. Validate the Complete Certificate Chain
Verify trust anchors, signatures, identity, validity and applicable constraints.
4. Check Service Identity
For HTTPS, verify the expected hostname or other appropriate service identifier through SAN.
5. Monitor Certificate Expiration
Use automated alerts and renewal processes.
6. Revoke Compromised Credentials
Do not rely only on expiration after a known key compromise.
Apply the revocation behavior required by the environment.
7. Separate Certificate Authorities by Purpose
Protect root keys and use appropriate issuing CA arrangements.
8. Enforce Authorization Separately
An authenticated certificate identity does not automatically have administrative privileges.
9. Protect Enrollment and Renewal
Attackers may target certificate issuance or enrollment systems to obtain unauthorized certificates.
10. Avoid Unnecessary Root Trust
Install trusted CA certificates only through approved administrative processes.
Practical OpenSSL Lab — Build a Private CA and Test Mutual TLS
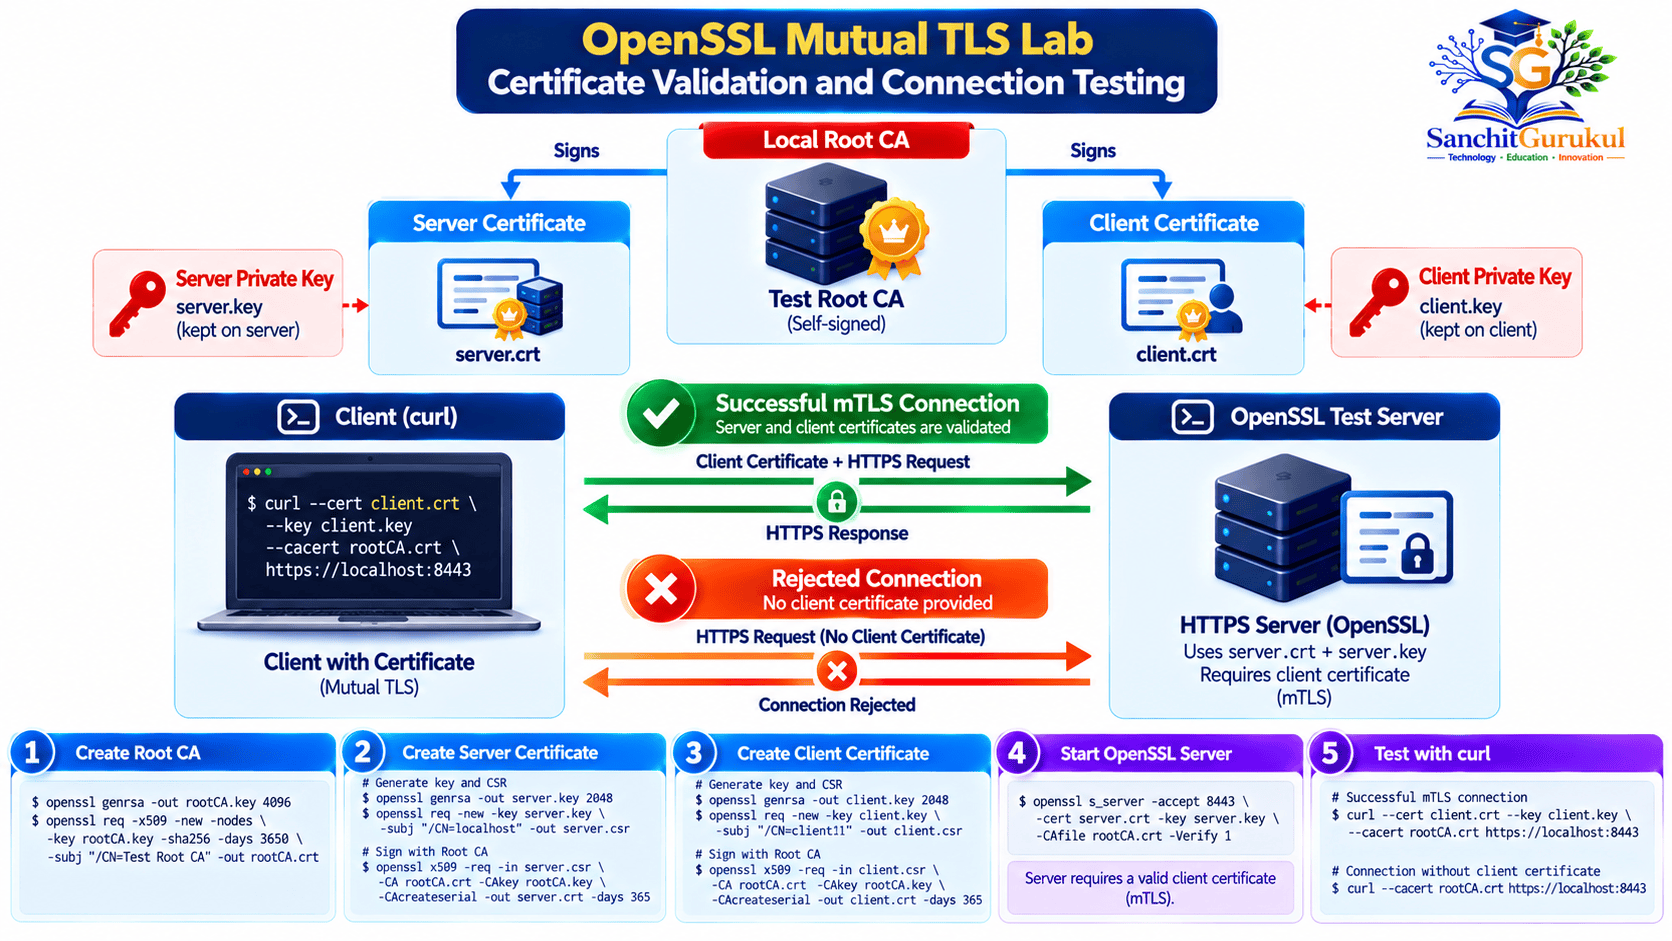
This lab demonstrates certificate-based authentication using a local test environment.
You will:
- Create a local Root CA.
- Create a TLS server certificate.
- Create a TLS client certificate.
- Verify certificate trust and intended usage.
- Start a local server requiring a client certificate.
- Connect successfully using a client certificate.
- Observe a failed connection without a client certificate.
The commands use OpenSSL 3.x and curl on a Linux system.
Lab Requirements
- Ubuntu or another compatible Linux system
- OpenSSL 3.x
- curl
- Terminal access
- Permission to create local test files
All certificates and keys in this lab are disposable.
The lab does not use a public Certificate Authority or a production website.
Step 1 — Create a Working Directory
Open a terminal.
mkdir -p "$HOME/sg-mtls-lab"
cd "$HOME/sg-mtls-lab"
umask 077
openssl version
Expected version format:
OpenSSL 3.x.xThe umask 077 setting restricts permissions on newly created files within this shell session.
Use this directory and terminal for the following certificate-generation steps.
Step 2 — Create a Local Root CA
Generate a private key and a self-signed CA certificate.
openssl req -x509 -newkey rsa:3072 -sha256 -days 2 -noenc -keyout ca.key -out ca.crt -subj "/CN=SG Lab Root CA" -addext "basicConstraints=critical,CA:TRUE" -addext "keyUsage=critical,keyCertSign,cRLSign"This creates:
ca.key— CA private keyca.crt— CA certificate
The CA certificate is valid for two days.
The private key is deliberately unencrypted for this isolated teaching lab and must not be reused in production.
Step 3 — Generate a Server Key and CSR
A Certificate Signing Request (CSR) contains information needed to request a certificate and a corresponding public key.
Generate the server key and CSR.
openssl req -newkey rsa:2048 -noenc -keyout server.key -out server.csr -subj "/CN=localhost"Create a certificate extension file.
nano server.extAdd:
subjectAltName=DNS:localhost
basicConstraints=critical,CA:FALSE
keyUsage=critical,digitalSignature,keyEncipherment
extendedKeyUsage=serverAuth
Save the file.
The subjectAltName entry allows the certificate to identify localhost during server identity verification.
The serverAuth value identifies its intended TLS server purpose.
Step 4 — Sign the Server Certificate
Use the local CA to sign the server CSR.
openssl x509 -req -in server.csr -CA ca.crt -CAkey ca.key -CAcreateserial -out server.crt -days 2 -sha256 -extfile server.extThe resulting file is:
server.crt
This certificate is signed by the local CA.
Step 5 — Generate a Client Key and CSR
Generate the client key and CSR.
openssl req -newkey rsa:2048 -noenc -keyout client.key -out client.csr -subj "/CN=sg-lab-client"Create the client certificate extension file.
nano client.extAdd:
basicConstraints=critical,CA:FALSE
keyUsage=critical,digitalSignature
extendedKeyUsage=clientAuth
Save the file.
The clientAuth extension identifies the certificate’s intended client-authentication purpose.
Step 6 — Sign the Client Certificate
Execute:
openssl x509 -req -in client.csr -CA ca.crt -CAkey ca.key -CAcreateserial -out client.crt -days 2 -sha256 -extfile client.extThe resulting file is:
client.crt
Both server and client certificates are now signed by the same local CA.
Step 7 — Verify the Certificates
Verify the server certificate.
openssl verify -CAfile ca.crt -purpose sslserver -verify_hostname localhost server.crtExpected output:
server.crt: OKVerify the client certificate.
openssl verify -CAfile ca.crt -purpose sslclient client.crtExpected output:
client.crt: OKThese commands check certificate-path trust, the selected verification purpose and, for the server, the hostname.
They do not constitute a complete production PKI audit or an independent revocation check.
Step 8 — Start a TLS Server Requiring Client Certificates
Open a terminal in the lab directory.
Execute:
openssl s_server -accept 127.0.0.1:8443 -cert server.crt -key server.key -CAfile ca.crt -Verify 1 -verify_return_error -www -tls1_3This starts a local TLS 1.3 test server on port 8443.
The command:
- Presents the server certificate.
- Trusts client certificates issued by the lab CA.
- Requires a client certificate.
- Rejects failed client-certificate verification.
- Provides an OpenSSL test response over HTTPS.
Leave this terminal running.
Step 9 — Connect Using the Client Certificate
Open a second terminal.
Navigate to the lab directory.
cd "$HOME/sg-mtls-lab"Connect using curl.
curl --noproxy '*' --fail --silent --show-error --cacert ca.crt --cert client.crt --key client.key -o /dev/null -w 'HTTP %{http_code}n' https://localhost:8443/Expected output:
HTTP 200The client trusts the server because it explicitly uses ca.crt.
The server accepts the client because it validates client.crt and the associated private-key proof.
This demonstrates mutual TLS authentication.
Step 10 — Test Without a Client Certificate
Now attempt the connection without supplying a client certificate.
curl --noproxy '*' --cacert ca.crt https://localhost:8443/The connection should fail because the TLS server requires a valid client certificate.
Depending on the curl and OpenSSL versions, the error may include wording similar to:
tlsv13 alert certificate requiredThis is an expected failure.
The client can validate the server certificate, but it has not provided the certificate required for mutual authentication.
Step 11 — Review the Authentication Result
The successful test proves that:
- The client trusted the lab server certificate.
- The server trusted the client certificate.
- The client possessed the corresponding private key.
- The TLS authentication process completed successfully.
The failed test demonstrates that a trusted server certificate alone does not satisfy the server’s client-certificate requirement.
Stop the OpenSSL server by pressing Ctrl + C in its terminal.
Lab Verification Summary
| Test | Expected Result |
|---|---|
| Root CA Created | Successful |
| Server Certificate Issued | Successful |
| Client Certificate Issued | Successful |
| Server Certificate Validation | OK |
| Client Certificate Validation | OK |
| TLS Connection with Client Certificate | HTTP 200 |
| TLS Connection Without Client Certificate | Rejected |
| TLS Version | TLS 1.3 |
Key Takeaways
Core Certificate Concepts
- Certificate-based authentication uses public-key cryptography.
- A digital certificate contains a public key, not the corresponding private key.
- The certificate issuer signs the certificate.
- The certificate holder proves possession of the private key.
- Trust and authorization are separate decisions.
PKI and TLS
- PKI manages certificate issuance, trust and lifecycle.
- Root and intermediate CAs form certificate hierarchies.
- TLS 1.3 uses cryptographic signatures for certificate-based authentication.
- HTTPS normally authenticates the server.
- mTLS authenticates both the client and server.
Certificate Operations
- Validate certificate chains, purposes and service identities.
- Protect private keys.
- Monitor expiration.
- Renew certificates automatically where appropriate.
- Revoke compromised credentials.
- Enforce certificate identity mapping and authorization policies.
Security and Troubleshooting
- A trusted certificate does not guarantee application access.
- An expired or revoked certificate may be rejected.
- An incorrect hostname can cause TLS authentication failure.
- Missing intermediates can break certificate-chain validation.
- Compromised private keys can undermine certificate identity.
- Certificate-based authentication is not automatically MFA.
Certificate-based authentication is an important part of modern cybersecurity and enterprise infrastructure.
It is used to establish trust between websites, users, devices, applications and network services.
Digital certificates provide a standardized way to associate identities with cryptographic public keys.
However, their security depends on proper certificate issuance, validation, private-key protection and lifecycle management.
Modern TLS 1.3 and mutual TLS use cryptographic signatures to authenticate certificate holders, while enterprise PKI supports large-scale credential issuance and management.
Understanding these concepts is essential for working with HTTPS, VPNs, network access control, identity infrastructure and secure APIs.
Next in This Series: Public Key Infrastructure (PKI) Explained — Root CA, Intermediate CA, CSR, Certificate Chains and Revocation.
Useful Links and References
SanchitGurukul Static Resources
Official External References
Your feedback matters
Was this post helpful?
Discussion
0 approved comments
No approved comments yet. You can start the discussion below.
Leave a Comment
No login is required. Name and email are used for moderation/security. Your email is never displayed publicly. All comments require administrator approval.
Discover more from SanchitGurukul
Subscribe to get the latest posts sent to your email.