
Prerequisites: VSX Architecture, SmartConsole, SIC, VLANs, Routing and Security Policy Fundamentals
Imagine your organization has approved a Check Point VSX deployment.
The architecture is ready, the platform is supported, and the network team has planned separate Virtual Systems for Finance and Sales.
Now comes the important part: turning that design into a working environment.
Unlike configuring an ordinary firewall, VSX deployment involves a hosting Gateway, its management context, Virtual Systems and potentially additional Virtual Devices.
A mistake in the initial architecture can affect several logical firewalls at once.
This article explains the deployment process in the correct order.
You will learn:
- How to prepare a traditional VSX Gateway
- How to create the VSX Gateway in SmartConsole
- How to initialize SIC and verify VSX configuration
- How to create and configure Virtual Systems
- How to install policies on the appropriate Virtual Systems
- How to review routing, NAT and virtual connectivity
- How to monitor VSX and clusters
- Which CLI commands are useful for troubleshooting
This guide focuses on a traditional, single VSX Gateway deployment. Cluster-specific verification is covered separately, without making disruptive failover changes part of the basic procedure.
Planning the Example VSX Environment
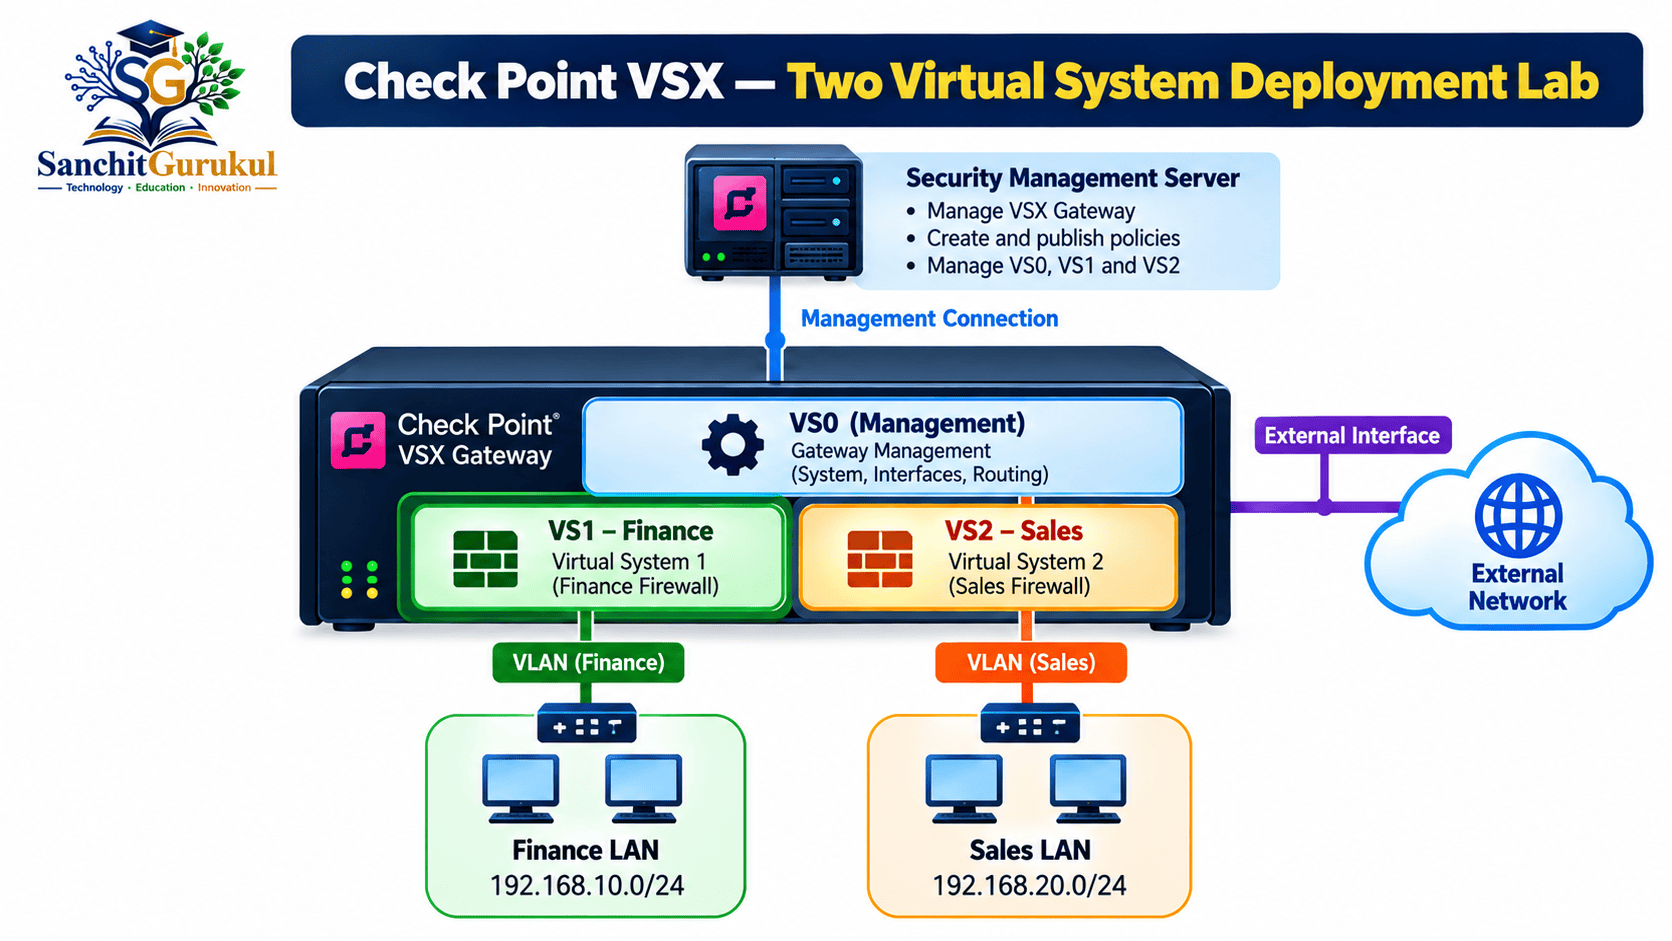
The lab contains one VSX Gateway and two Virtual Systems.
Example Network
| Component | Address / Network | Purpose |
|---|---|---|
| Management Server | 192.168.100.10 | Central management |
| VSX Gateway Management | 192.168.100.1 | VS0 management |
| VS1 | VSID 1 | Finance firewall |
| Finance LAN | 192.168.10.0/24 | Finance network |
| VS2 | VSID 2 | Sales firewall |
| Sales LAN | 192.168.20.0/24 | Sales network |
| Upstream Network | Deployment-specific | External connectivity |
The VSIDs are illustrative and must be confirmed from the actual deployed configuration.
This lab assumes supported VLAN-backed interfaces for the protected networks and a correctly planned external topology.
Step 1 — Prepare the VSX Platform
Before creating the VSX Gateway object, prepare the supported physical or virtual platform.
Prerequisites
Verify:
- Supported hardware or virtual platform
- Compatible Gaia and Check Point software
- VSX licensing
- Management Server compatibility
- Correct physical interfaces and VLAN design
- Management IP address, routing and DNS
- Time synchronization
- Appropriate administrator permissions
- Approved deployment or maintenance procedure
Install the Supported Software
Follow the official Check Point installation procedure for a traditional VSX Gateway.
During the Gaia First Time Configuration Wizard, configure the appropriate installation role and management settings.
Configure the SIC activation key required for management trust.
Important Deployment Restriction
Check Point documents that converting an existing ordinary Security Gateway to a VSX Gateway is not supported through the normal VSX creation procedure.
Similarly, converting a VSX Gateway back into an ordinary Gateway is not a supported simple mode switch.
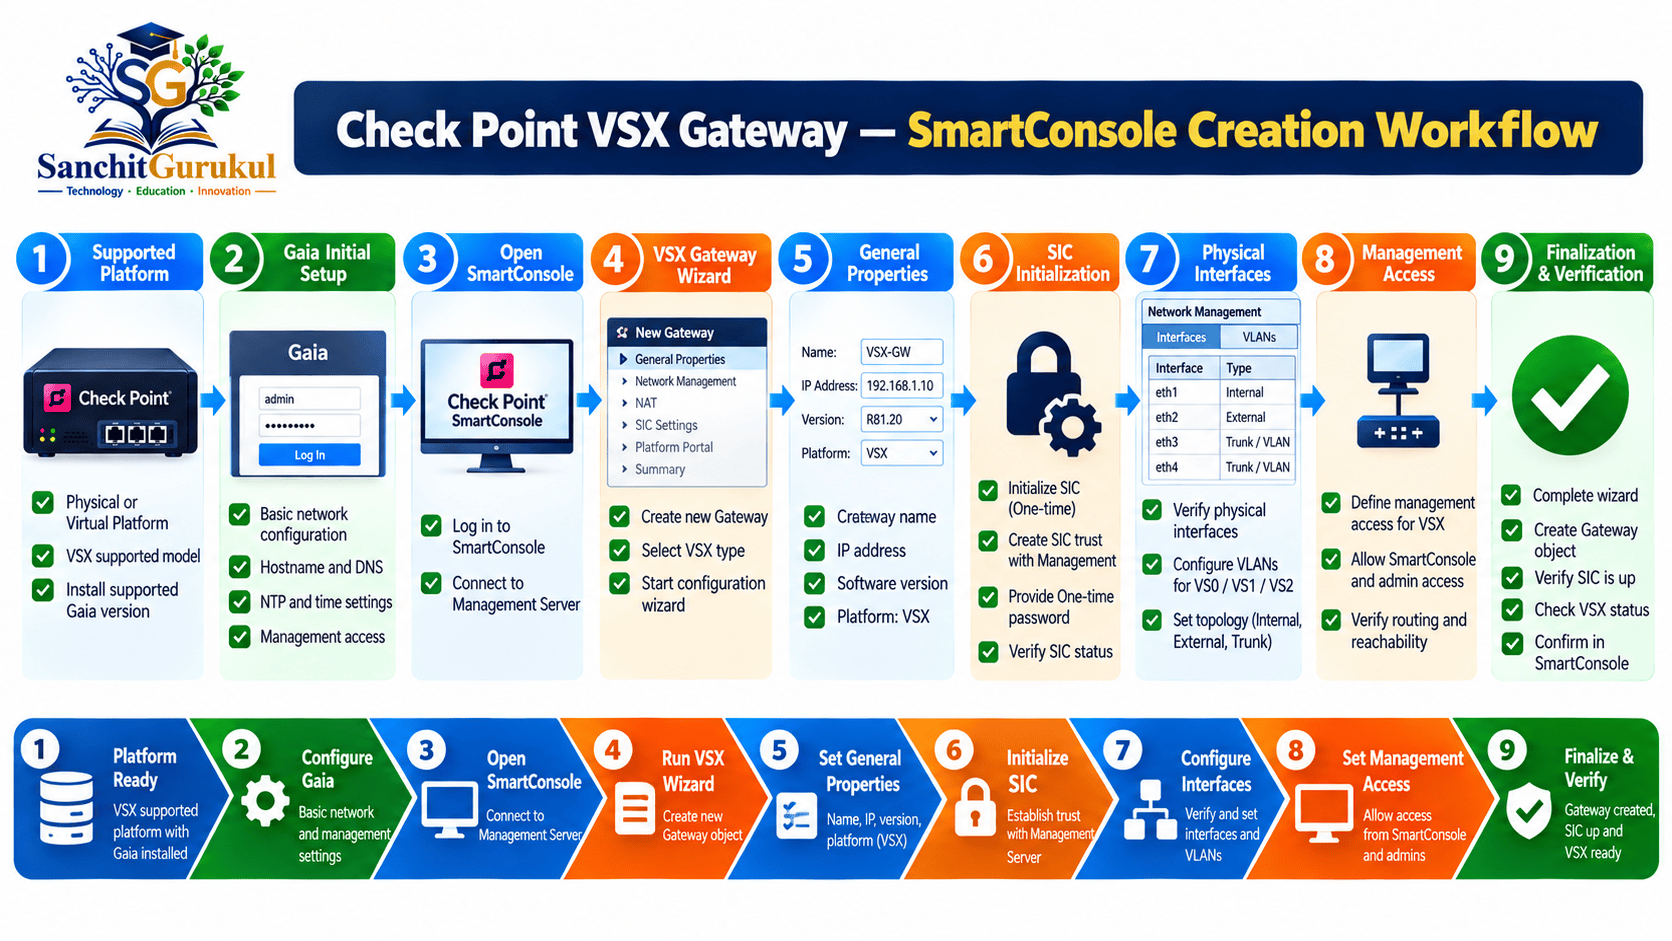
Step 2 — Create the VSX Gateway in SmartConsole
After preparing the platform, register the VSX Gateway with the Management Server.
Open the VSX Gateway Wizard
- Log in to SmartConsole.
- Open Gateways & Servers.
- Select New → VSX → Gateway.
- Open the VSX Gateway Wizard.
Configure General Properties
Define the Gateway name, management address and installed software version.
Example:
| Setting | Value |
|---|---|
| Gateway Name | VSX-GW-01 |
| Management Address | 192.168.100.1 |
| Gateway Version | Actual installed version |
| Deployment | Traditional VSX Gateway |
Use the installed software version rather than choosing a version only because it appears in documentation.
Initialize SIC
The wizard includes SIC trust initialization between the VSX Gateway and its Management Server.
Enter the corresponding activation key configured during initial installation.
Verify successful trusted communication before continuing.
Review Physical Interfaces
The wizard retrieves and configures the applicable physical interfaces.
Confirm the intended management and data interfaces.
For production environments, verify the switch-port and VLAN design before accepting the final topology.
Review Virtual Device Configuration
The wizard can provide options to create an initial Virtual Network Device.
For a straightforward deployment, create additional Virtual Devices later if they are not required during initial Gateway creation.
Review VSX Management Access
Review the management access policy for the VSX Gateway.
These rules apply to the management context and must not be confused with production Access Control policies installed on Virtual Systems.
Complete the Wizard
Finish the process and review the creation report.
The VSX Gateway object should now exist in SmartConsole.
Step 3 — Verify the VSX Gateway
After creation, verify that the VSX configuration is loaded.
Connect to the VSX Gateway through an authorized CLI session.
Enter Expert mode.
Display VSX Configuration and Status
vsx stat -vThis is one of the most useful initial VSX diagnostic commands.
It helps administrators inspect:
- Configured Virtual Devices
- Device status
- Installed policy information
- SIC status
Check Licensing
cplic printVerify that the required licenses are installed.
Review VS0 Context
vsenv 0This selects VS0 as the current virtual environment in the Expert shell.
Expected verification — illustrative summary

VSX Gateway: Available

VS0: Management context present

Virtual Devices: Correspond to deployed configuration

SIC: Established

Licensing: Appropriate for the deployment

Security Policy: Relevant policy installed
This summarizes expected conditions; it is not literal CLI output.
Step 4 — Create the Finance Virtual System
Now create the first production Virtual System.
Open the Virtual System Wizard
In SmartConsole:
- Open Gateways & Servers.
- Select New → VSX → New Virtual System.
- Enter the name.
- Select the hosting VSX Gateway.
- Continue to network configuration.
For the example:
VS_Finance
The system assigns or uses a VSID according to its managed configuration.
Do not assume that the VSID will always match the order in which the administrator creates objects.
Configure Virtual System Networking
The Virtual System Wizard allows configuration of supported interfaces and routing information.
For Finance:
| Property | Example |
|---|---|
| Virtual System | VS_Finance |
| Protected Network | 192.168.10.0/24 |
| Network Connection | Planned VLAN interface |
| External Connectivity | Defined by approved topology |
| Default Route | Appropriate next hop or supported Virtual Router |
Configure the actual interface addresses, topology and next hops using the network design.
Review Available Interface Types
Depending on the selected mode and supported configuration, the wizard provides options such as:
- Regular interface
- Leads to Virtual Switch
- Leads to Virtual Router
- Bridge
Do not use a Virtual Router merely because it is available.
Choose it only when the architecture requires that routing function.
Complete the Wizard
Finish the Virtual System configuration.
Review the resulting object and network topology.
Step 5 — Create the Sales Virtual System
Repeat the Virtual System creation process for Sales.
Example:
| Property | Example |
|---|---|
| Virtual System | VS_Sales |
| Protected Network | 192.168.20.0/24 |
| Network Connection | Planned VLAN interface |
| External Connectivity | Defined by approved topology |
The Finance and Sales Virtual Systems now represent two independent logical firewall environments.
Understanding Separate Security Contexts
Each Virtual System must have suitable:
- Interfaces
- Routes
- Topology
- Security policy
- NAT configuration, if required
- Logging configuration
Step 6 — Configure and Install Virtual System Policies
Creating a Virtual System does not complete its security configuration.
Each production Virtual System needs an appropriate installed Access Control policy.
Example Policy Requirements
| Virtual System | Source | Destination | Service | Action |
|---|---|---|---|---|
| VS_Finance | Finance LAN | Approved Finance Application | HTTPS | Accept |
| VS_Sales | Sales LAN | Approved CRM Application | HTTPS | Accept |
These are examples of separate policy requirements.
Policy Installation Procedure
- Open Security Policies in SmartConsole.
- Select or create the applicable policy package.
- Configure the required network and service objects.
- Create appropriate Access Control rules.
- Review NAT, where necessary.
- Publish the management changes.
- Select Install Policy.
- Choose the appropriate Virtual System target.
- Confirm successful installation.

Step 7 — Verify Each Virtual System Using CLI
The VSX command-line environment allows administrators to inspect the relevant Virtual System.
Display Virtual System Information
vsx stat -vConfirm the actual VSIDs and expected Virtual System objects.
Switch to Finance VS
Assuming Finance has VSID 1:
vsenv 1The command selects Virtual System 1 in the Expert environment.
Review Routing
In the appropriate Expert context:
ip route showReview the routes associated with the selected Virtual System.
Review Firewall Policy
fw statConfirm that the expected policy information is reported.
Switch to Sales VS
Assuming Sales has VSID 2:
vsenv 2Repeat the routing and policy checks.
Return to VS0
vsenv 0Step 8 — Understand VSX Clustering and Failover
A production environment may require a VSX Cluster instead of a single Gateway.
A VSX Cluster uses multiple supported cluster members with corresponding Virtual Device configurations.
Depending on the supported software release and deployment history, VSX clustering can involve Virtual System Load Sharing and other documented cluster arrangements.
Virtual System Load Sharing (VSLS)
VSLS allows Virtual Systems to have their active processing distributed across the supported cluster members.
This should not be confused with a simple design in which one physical member always handles every Virtual System.
Cluster Verification Commands
Run in the supported Expert context:
cphaprob stateFor synchronization status:
cphaprob syncstatFor VSX configuration:
vsx stat -vIn supported cluster contexts, administrators can also use VSID-specific cluster state commands.
Cluster Verification Checklist
| Check | Expected Condition |
|---|---|
| Member connectivity | Required members reachable |
| Virtual Devices | Expected devices present |
| Security Policies | Installed on relevant Virtual Systems |
| Cluster state | Consistent with configured cluster mode |
| Synchronization | Healthy where applicable |
| Routing | Correct paths for the active VS instances |
| Logging | Events visible from expected devices |
Step 9 — Troubleshoot Common VSX Problems
VSX troubleshooting becomes easier when the administrator first identifies whether the problem belongs to the physical platform, a Virtual System or the virtual network design.
Common Problems
| Problem | Possible Cause | Recommended Check |
|---|---|---|
| Virtual System is missing | Incomplete provisioning | Review vsx stat -v |
| Virtual System cannot reach upstream router | Missing route or interface issue | Check VS routing and connectivity |
| Policy not taking effect | Wrong policy target | Review installed policy |
| VLAN traffic not reaching VS | VLAN or interface mismatch | Verify switch trunk and VS interface |
| SIC problem | Management trust issue | Check VSX status and communication |
| Unexpected traffic drop | Policy or Anti-Spoofing | Inspect logs and topology |
| High resource use | Shared platform capacity pressure | Review platform and VS utilization |
| Cluster state unexpected | Member or synchronization problem | Review ClusterXL diagnostics |
Practical Troubleshooting Sequence
- Verify the physical interface and VLAN configuration.
- Check overall VSX status.
- Identify the correct VSID.
- Switch to the relevant Virtual System context.
- Review the route table.
- Confirm the installed security policy.
- Review SmartConsole logs.
- Check NAT where required.
- Verify the upstream and return paths.
- Confirm cluster status when applicable.
VSX Administration Best Practices
Plan for Capacity
Monitor shared CPU, memory, connection load and platform capacity.
Do not assume that creating an additional VS has no resource cost.
Use Consistent Naming
Adopt clear names for Gateways, Virtual Systems, network interfaces, VLANs and policy packages.
Maintain Network Documentation
Record VSIDs, interfaces, routes, connected Virtual Devices and protected networks.
Restrict Management Access
Protect VS0 and the management infrastructure using approved administrative access rules.
Review Security Policies Separately
Audit the policy of each Virtual System according to its business purpose.
Use Supported Backup Procedures
Follow Check Point’s documented VSX backup and restore process.
A general operating-system backup should not be assumed to replace a full VSX recovery procedure.
Control Production Changes
Test topology and policy changes in an approved manner, especially where Virtual Devices share uplinks or routing paths.
Key Takeaways — VSX Deployment
- Prepare a supported platform before creating the VSX Gateway.
- Use SmartConsole and the VSX Gateway Wizard for supported Gateway creation.
- Establish SIC and verify the VSX configuration.
- Create Virtual Systems through the supported Virtual System Wizard.
- Configure correct interfaces, routing and topology.
- Install the relevant security policy on each production Virtual System.
Key Takeaways — Verification
vsx stat -vis a key VSX diagnostic command.vsenvselects a Virtual System context in Expert mode.fw stathelps verify policy status.ip route showdisplays routes in the selected network context.cplic printhelps verify licensing.cphaprob stateandcphaprob syncstatsupport cluster verification where applicable.
Conclusion
Deploying Check Point VSX requires more planning than configuring a conventional single-context firewall.
The administrator must prepare the platform, establish management trust, create Virtual Systems and connect them to the correct virtual and physical networks.
Each production Virtual System then needs suitable routing, topology and an installed security policy.
A reliable deployment also depends on accurate VSID management, resource monitoring, backups and documented troubleshooting procedures.
With these foundations in place, VSX can provide flexible logical firewall separation while making effective use of supported shared infrastructure.
Useful Links and References
SanchitGurukul Static Resources
Official External References
Your feedback matters
Was this post helpful?
Discussion
0 approved comments
No approved comments yet. You can start the discussion below.
Leave a Comment
No login is required. Name and email are used for moderation/security. Your email is never displayed publicly. All comments require administrator approval.
Discover more from SanchitGurukul
Subscribe to get the latest posts sent to your email.


